def load_posts(self):
for post_input_path in Path(self.post_dir).iterdir():
- post_md_input_path = Path(self.post_md_dir) / post_input_path.relative_to(self.post_dir).with_suffix(".md")
+ post_md_input_path = Path(self.post_md_dir) / "known-good" / post_input_path.relative_to(self.post_dir).with_suffix(".md")
+ if not post_md_input_path.exists():
+ post_md_input_path = Path(self.post_md_dir) / post_input_path.relative_to(self.post_dir).with_suffix(".md")
+
self.add_post(Post(frontmatter.load(post_input_path), self, frontmatter.load(post_md_input_path)))
def add_post(self, post):
import markdown2
-from bs4 import BeautifulSoup
+from bs4 import BeautifulSoup, NavigableString, Tag
def post_process(soup):
for table in soup.find_all("table"):
figure = soup.new_tag("figure")
figure['class'] = "wp-block-table"
- table.wrap(figure)
+ figure = table.wrap(figure)
+
+ # Look for a figcaption
+ n = figure.next_sibling
+ while isinstance(n, NavigableString):
+ n = n.next_sibling
+ if isinstance(n, Tag) and n.name == "figcaption":
+ n.extract()
+ figure.append(n)
for video in soup.find_all("video"):
figure = soup.new_tag("figure")
if parent.name == "p" and len(list(parent.children)) == 1:
parent.unwrap()
- #for p in soup.select("blockquote > p"):
- # if len(p.find_previous_siblings("p")) > 0: continue
- # p['style'] = "color:#222222;"
- #for p in soup.select("li > p"):
- # p.unwrap()
return soup
def markdown2html(html):
--- /dev/null
+---
+author: admin
+categories:
+- Technical
+date: 2024-05-12 19:59:50-07:00
+markup: html
+source: wordpress
+tags:
+- command-line
+- linux
+title: A mystery in the text editor
+updated: 2024-05-13 12:49:32-07:00
+wordpress_id: 1351
+wordpress_slug: a-mystery-in-the-text-editor
+---
+Hello, Linux terminal users! Let me present you a simple feature you’ve all seen, but might not have noticed.
+
+[](https://blog.za3k.com/wp-content/uploads/2024/05/01-mystery.png)
+
+You’re on the terminal, and you open a text editor of chice–nano, vim, emacs, acme etc.
+
+[](https://blog.za3k.com/wp-content/uploads/2024/05/02-mystery.png)
+
+After you edit for a bit, you close the editor.
+
+[](https://blog.za3k.com/wp-content/uploads/2024/05/03-mystery.png)
+
+Now you’re back where you left off. My question is, *how?* How does nano remember what used to be on screen? How does it get restored? Is nano doing this, or bash?
+
+Well, I took at look at the [source code](https://github.com/madnight/nano/blob/master/src/nano.c) to *nano*. Then I thought, “whoa! that’s way too complicated.” So I found a much simpler project called *ted* someone made to educate themselves. That was [also](https://github.com/madnight/nano/blob/master/src/nano.c) a little complicated, but both seemed to use ncurses. So I wrote the following simple program, which *also* displays something and then restores the screen. Even though it’s very simple, it still works.
+
+```
+// Compile with: gcc -lncurses editor.c -o editor
+
+#include <curses.h>
+#include <stdio.h>
+
+int main(int argc, char **argv) {
+ initscr();
+
+ refresh();
+ printw("Hello world");
+ getch();
+
+ endwin();
+ return 0;
+}
+```
+
+Aha, so it’s something in ncurses, maybe. Let’s dive deeper.
+
+So *initscr()* presumably saves the state in some fashion. *endwin()* definitely restores it, because if we comment that out, the terminal stops being restored. Since *initscr()* probably does lots of other irrelevant logic, we could take a look at *endwin()* to dive in. But let’s do something even simpler first.
+
+As background, the linux command line is pretending to be an obsolete piece of hardware called a [terminal](https://en.wikipedia.org/wiki/Computer_terminal). Specifically, it’s pretending to be a model called the DEC VT100 (or a later one, but they’re mostly backwards compatible). The terminal accepted text over a wire, and printed it to the screen.
+
+When it got special text, it would do special things. These are captured today as “escape codes”–special non-printable characters, which cause your software terminal to also do special things. What kind of special things? Well one example escape code is “Backspace”, which deletes the last character. Another code is “\\r\\n” (carriage return; new line), which goes to the beginning of the line, and down one.
+
+I suspect the answer to what’s happening with save and restore of my terminal might be some magic escape codes. So let’s just redirect the output to a file, and see what data is being center over the virtual wire to our virtual terminal.
+
+```
+$ ./editor >magic.txt
+$ xxd < magic.txt
+00000000: 1b28 421b 2930 1b5b 3f31 3034 3968 1b5b .(B.)0.[?1049h.[
+00000010: 313b 3530 721b 5b6d 0f1b 5b34 6c1b 5b48 1;50r.[m..[4l.[H
+00000020: 1b5b 4a48 656c 6c6f 2077 6f72 6c64 6a1b .[JHello worldj.
+00000030: 5b35 303b 3148 1b5b 3f31 3034 396c 0d1b [50;1H.[?1049l..
+00000040: 5b3f 316c 1b3e [?1l.>
+```
+
+Well, that’s certainly a bunch of magic. Now something cool happens:
+
+```
+$ cat magic.txt
+```
+
+This command does *nothing visible*. It doesn’t print “Hello world”, even though that’s in the file. In other words, it’s printing Hello world, then really quick resetting the terminal. Just too fast for my poor human eyes to see.
+
+We’ve confirmed the escape code theory! This file has everything we need. We can look at the source code to ncurses if we’re curious, but we don’t need to (and I won’t).
+
+One thing I immediately see in this file, is that it *doesn’t* seem to contain the words that were on screen. So it’s not that the program read what was on screen, and printed it back later. Rather, there are some magic escape sequences happening to save and restore the terminal.
+
+Okay, so somewhere in those 70 bytes is a magic code or two we want. Let’s examine all the bytes.
+
+What kinds of escape codes appear here? Hex **0x1b** is ESC, basically *the* escape sequence–it cues the terminal in that a special escape code is coming. **0x1b9b** ( **ESC** followed by **\[**) is the CSI escape code. [DEC private codes](https://en.wikipedia.org/wiki/VT100) refer to other escape sequences used by the DEC terminals like the VT00 (I’ll just shorten this to “DEC” below).
+
+Without further ado, let’s break down those 70 bytes. Apologies for any errors below–correct me in the comments.
+
+- **0x1b** (B
+ - Set first character set to US ASCII \[[xterm DEC guide](https://www.xfree86.org/current/ctlseqs.html)\]
+- **0x1b** )0
+ - Set second character set to “DEC Special Character and Line Drawing Set” \[[xterm DEC guide](https://www.xfree86.org/current/ctlseqs.html)\]
+- **0x1b9b** ?1049h
+ - **Save cursor as in DECSC and use Alternate Screen Buffer, clearing it first.** \[[xterm CSI guide](https://www.xfree86.org/current/ctlseqs.html)\]
+- **0x1b9b** 1;49r
+ - DECSTBM: Set scrolling region to rows 1-49 \[[xterm CSI guide](https://www.xfree86.org/current/ctlseqs.html)\]
+ (When I ran the program, my terminal was 49 lines tall inside tmux–so the whole terminal in other words.)
+- **0x1b9b** m
+ - (Empty) color and style set comand \[[ANSI/CSI](https://gist.github.com/fnky/458719343aabd01cfb17a3a4f7296797)\]
+ I think this could be left out entirely.
+- **0x0f (Ctrl-O)**
+ - Shift In. Use the standard character set. \[[xterm](https://www.xfree86.org/current/ctlseqs.html)\]
+- **0x1b9b** 4l
+ - RM: Replace Mode / IRM \[[xterm CSI guide](https://www.xfree86.org/current/ctlseqs.html)\]
+ Typing doesn’t shift everything over, it writes over existing content.
+- **0x1b9b** H
+ - Move the cursor to “home” (top left of the screen) \[[ANSI/CSI](https://gist.github.com/fnky/458719343aabd01cfb17a3a4f7296797)\]
+- **0x1b9b** J
+ - Clear the screen \[[ANSI/CSI](https://gist.github.com/fnky/458719343aabd01cfb17a3a4f7296797)\]
+- Hello worldj
+ - The program prints “Hello world”. The final j was echoed when I pressed “j” to exit.
+- **0x1b9b** 49;1H
+ - Move the cursor to line 49, column 1 — the bottom-left corner \[[ANSI/CSI](https://gist.github.com/fnky/458719343aabd01cfb17a3a4f7296797)\]
+- **0x1b9b** ?1049l
+ - **Use Normal Screen Buffer and restore cursor as in DECRC** \[[xterm CSI guide](https://www.xfree86.org/current/ctlseqs.html)\]
+- **0x0d (\\r or Ctrl-M)**
+ - Carriage return \[[xterm](https://www.xfree86.org/current/ctlseqs.html)\]
+ Moves cursor to column 0
+- **0x1b9b** ?1l
+ - DECCKM reset: Re-enables the cursor? \[[VT100](https://vt100.net/docs/vt220-rm/chapter4.html#S4.6.18)\]
+- **0x1b** \>
+ - DECONM: Normal Keypad \[[xterm DEC guide](https://www.xfree86.org/current/ctlseqs.html), [VT100](https://vt100.net/docs/vt220-rm/chapter4.html#S4.6.18)\]
+
+OK, solved. The magic save bytes are **1b 9b 3f 31 30 34 39 68** (\<ESC\> \[?1049h). The magic restore bytes are **1b 9b 3f 31 30 34 39 6c** (\<ESC\> \[?1049l). And xterm or tmux is doing the save/restore magic, based on seeing this escape mode.
+
+Hmm, how minimal can we get a working file, I wonder?
+
+```
+#!/bin/sh
+echo -ne '\x1b[?1049h' # Save terminal
+echo -ne '\x1b[H' # Home the cursor
+echo "Hello world"
+sleep 1
+echo -ne '\x1b[?1049l' # Restore terminal
+```
+
+Yep. That works fine.
+
+ANSI: [https://gist.github.com/fnky/458719343aabd01cfb17a3a4f7296797](https://gist.github.com/fnky/458719343aabd01cfb17a3a4f7296797)
+DEC: [https://vt100.net/emu/ctrlseq\_dec.html](https://vt100.net/emu/ctrlseq_dec.html)
+DEC: [https://vt100.net/docs/vt220-rm/chapter4.html#S4.6.18](https://vt100.net/docs/vt220-rm/chapter4.html#S4.6.18)
+xterm’s control sequences: [https://www.xfree86.org/current/ctlseqs.html](https://www.xfree86.org/current/ctlseqs.html)
--- /dev/null
+---
+author: admin
+categories:
+- Technical
+date: 2014-11-23 14:35:14-07:00
+markup: html
+source: wordpress
+tags:
+- apis
+- backup
+- jq
+- system administration
+- twitter
+title: Archiving twitter
+updated: 2014-11-24 13:12:44-07:00
+wordpress_id: 61
+wordpress_slug: archiving-twitter
+---
+([Output](https://za3k.com/~twitter_archive/))
+
+I wanted to archive twitter so that I could
+
+1. Make sure old content was easily available
+2. Read twitter in a one-per-line format without ever logging into the site
+
+[twitter\_ebooks](https://github.com/mispy/twitter_ebooks) is a framework to make twitter bots, but it includes an ‘archive’ component to fetch historical account content which is apparently unique in that it 1) works with current TLS and 2) works the current twitter API. It stores the tweets in a JSON format which presumably matches the API return values. Usage is simple:
+
+<pre><code>
+while read account
+do
+ <a href="https://github.com/mispy/twitter_ebooks">ebooks</a> archive "${account}" "archive/${account}.json"
+ <a href="http://stedolan.github.io/jq/">jq</a> -r 'reverse | .\[\] | "\\(.created\_at|@sh)\\t \\(.text|@sh)"' "archive/${account}.json" >"archive/${account}.txt"
+done <accounts.txt
+</code></pre>
+
+I ran into a bug with [upstream incompatibilities](https://github.com/mispy/twitter_ebooks/issues/34) which is easily fixed. Another caveat is that the twitter API only allows access 3200 tweets back in time for an account–all the more reason to set up archiving ASAP. Twitter’s rate-limiting is also extreme ([15-180 req/15 min](https://dev.twitter.com/rest/public/rate-limiting)), and I’m [worried about](https://github.com/mispy/twitter_ebooks/issues/37) a problem where my naive script can’t make it through a list of more than 15 accounts even with no updates.
--- /dev/null
+---
+author: admin
+categories:
+- Non-Technical
+date: 2017-07-24 12:58:32-07:00
+markup: html
+source: wordpress
+tags:
+- blast furnace
+- diy
+- fire
+- furnace
+- metalworking
+title: Blast Furance
+updated: 2017-07-24 12:58:32-07:00
+wordpress_id: 430
+wordpress_slug: blast-furance
+---
+We made a blast furnace, following David Gingery’s [The Charcoal Foundry](https://www.amazon.com/Charcoal-Foundry-Build-Metal-Working/dp/1878087002). Here are some pictures of the firing process. We haven’t melted or cast any metal yet.
+
+[](https://blog.za3k.com/wp-content/uploads/2017/07/furnace-initial-burn.jpg)
+
+[](https://blog.za3k.com/wp-content/uploads/2017/07/furnace-blast.jpg)
+
+[](https://blog.za3k.com/wp-content/uploads/2017/07/furnace-fan.jpg)
+
+[](https://blog.za3k.com/wp-content/uploads/2017/07/furnace-grill.jpg)
+
+[](https://blog.za3k.com/wp-content/uploads/2017/07/furnace-richard.jpg)
--- /dev/null
+---
+author: admin
+categories:
+- Non-Technical
+date: 2015-03-08 15:02:31-07:00
+markup: html
+source: wordpress
+tags:
+- design
+- icon
+- informative
+- twitter
+title: Default twitter icons
+updated: 2015-03-08 15:02:59-07:00
+wordpress_id: 119
+wordpress_slug: default-twitter-icons
+---
+The default twitter icon is an egg. There are six available. One is chosen at random for each new user.
+
+<figure class="wp-block-gallery" markdown="1">
+[](https://blog.za3k.com/wp-content/uploads/2015/03/default_profile_1_bigger.png) [](https://blog.za3k.com/wp-content/uploads/2015/03/default_profile_2_bigger.png) [](https://blog.za3k.com/wp-content/uploads/2015/03/default_profile_3_bigger.png) [](https://blog.za3k.com/wp-content/uploads/2015/03/default_profile_4_bigger.png) [](https://blog.za3k.com/wp-content/uploads/2015/03/default_profile_5_bigger.png) [](https://blog.za3k.com/wp-content/uploads/2015/03/default_profile_6_bigger.png)
+</figure>
+
+Hex colors for the six icons:
+
+1. #e95f28
+2. #4a913c
+3. #ffac33
+4. #8899a6
+5. #744eaa
+6. #be1931
+
+Large versions of those icons:
+
+[](https://blog.za3k.com/wp-content/uploads/2015/03/default_profile_1.png) [](https://blog.za3k.com/wp-content/uploads/2015/03/default_profile_2.png) [](https://blog.za3k.com/wp-content/uploads/2015/03/default_profile_3.png) [](https://blog.za3k.com/wp-content/uploads/2015/03/default_profile_4.png) [](https://blog.za3k.com/wp-content/uploads/2015/03/default_profile_5.png) [](https://blog.za3k.com/wp-content/uploads/2015/03/default_profile_6.png)
--- /dev/null
+---
+author: admin
+categories:
+- Technical
+date: 2023-06-09 13:28:55-07:00
+markup: html
+source: wordpress
+tags:
+- hacks
+- hardware
+- zorchpad
+title: DIY keyboards (and how keyboards work)
+updated: 2023-06-12 13:20:11-07:00
+wordpress_id: 1059
+wordpress_slug: diy-keyboards-and-how-keyboards-work
+---
+I’ve been pondering simple input methods for microcontrollers. One obvious idea is, a keyboard! But for some reason, my USB keyboards use a staggering amount of power compared to my microcontrollers–1W of power for my mechanical keyboards, maybe 0.1W for the regular ones.
+
+Let’s look inside a commercial keyboard, and see if we can hook up to it:
+
+[](https://blog.za3k.com/wp-content/uploads/2023/06/commercial-scaled.jpg)
+
+Yikes. What’s going on? Well, let’s make our own little keyboard, and explore what’s going on. We’ll build it in three layers, or “index cards”:
+
+[](https://blog.za3k.com/wp-content/uploads/2023/06/copper_parts-scaled.jpg)
+
+The bottom layer has 6 vertical stripes. The top layer has 3 horizontal stripes. Each place they cross will be a “key” you can press.
+
+In between them, we add a spacer layer (punched holes) so they keys are “up” by default, and you have to press them to make them connect.
+
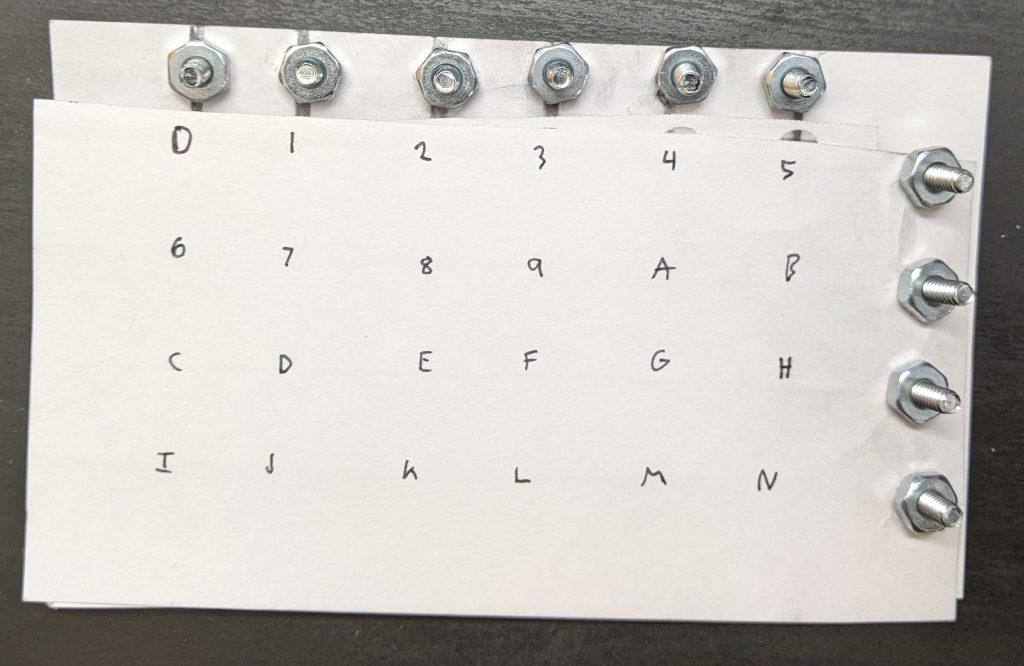
+This picture might help explain how they will go together:
+
+[](https://blog.za3k.com/wp-content/uploads/2023/06/copper_layers-scaled.jpg)
+
+Now we assemble:
+
+[](https://blog.za3k.com/wp-content/uploads/2023/06/copper_small.gif)
+
+The final keyboard has 6 x 3 = 18 “keys”. We write the hex digits plus a couple extra keys with marker.
+
+If I attach alligator clips to the second horizontal screw terminal, and fourth vertical screw terminals, and wire a battery and buzzer with the terminals, I get a connection beep only when I press the key “A”:
+
+[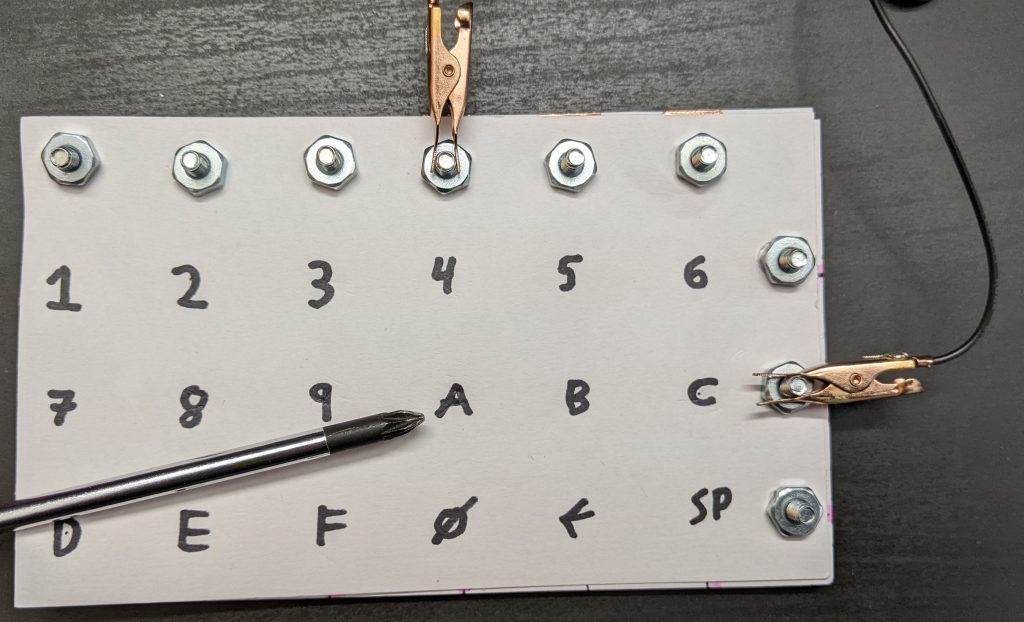](https://blog.za3k.com/wp-content/uploads/2023/06/address-scaled.jpg)
+
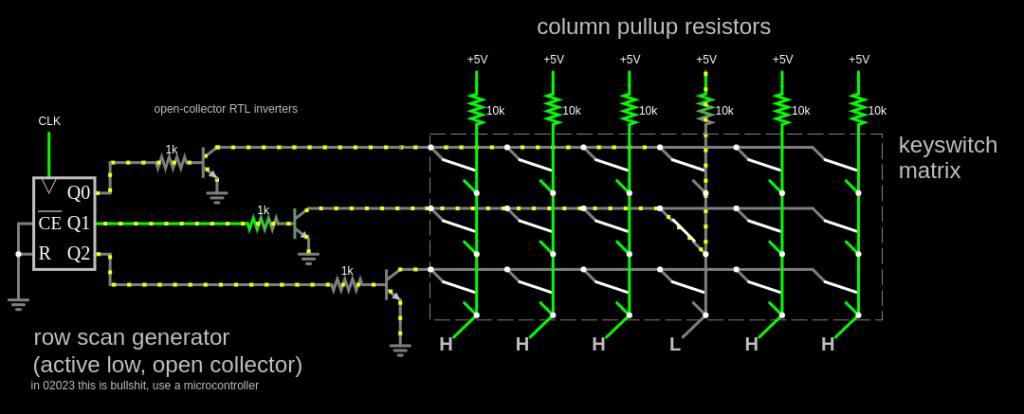
+In a real computer, we obviously can’t just move alligator clips around. Instead, we attach wires to all 9 posts–three outputs wires for the horizontal lines, and six inputs for the vertical lines. We output a signal on the first horizontal line, and see if we can read it from any of the six vertical lines inputs. Then we output a signal on the second horizontal line, and see if we can read it, and so on for the third. Assuming only one key is pressed (or none), we can identify the key. This “scanning” process could be done thousands of times a second, rapidly enough that it can’t miss our slowpoke human fingers.
+
+[](http://falstad.com/circuit/circuitjs.html?ctz=CQAgjCAMB0l3BWK0AckDMYwE4As3sA2SQgdgCYFsQFIaRd0aBTAWiwCgBncQ8bciEK4Q5XHToQALgCcArs24gi-QWFwixE8CFkKllPjkHpIm8VEt7FPMKSMDRY0Rcm75NhmAeDcwl9rSHkro6D4g6Cjmge76PKF8hhFREWaWQXFeiQh8fiKmIm7WSnbZic4F6bGeSUmVlUXBPCpJ6vlpjZneojlC7YU6xfFh4OQoySKlVUNZo+N54PbTTYtGY06TS501vWDrlVPbSip7422ry11r4-6Hg8EA7rxzytdQHE8n61On708-61a60gHx6bwSLxBTwhv1w3V+UOexleqj+KORP0ciMxglaWNBeJMI2RiJhjjh4URFLBERGSVJdN6tV6iOZRiW9NBUySLRZoN5RjKaP8Wj6qUKXI04vAUtF2NlFnOhwJzm5zjlKuiG2lpLS9TSGuhBosBy2oMimz4FoCaOtoutDVBCymC0NDBFFgWjqetyWHokHAASmL-P50IJtBYkNoYAgODIQyJbnt0vBEcnBL6+PLJimlWaE+dblKsBHwGmgzKk5MpeHLHQo-XkHGnuRVSm25b3gnO2Le6XU-BK72RRUyw26NH69AW9KB6bs-HpWG0gPJBXg5UV-lxwxJ03Y+aUvPjwWJmLrWvy0PNykwyk65H9zGZ06M+6uyCEwt-M6U+ubw-MUvV3RsX1ndg3nhYFQUg1F4XxJ44NaIUQQADxAVhxDoUIkEg0haXmFwQBkAB7B4AB0uC4ABjABDAA7KiAHNmAY5gZDoqRSJkDgACNwCQLARFwFBqFMah0JoEhwFCIRVRGcwQAAa2YABPLgHgASykGiAAsOAw2hBUnY9CCYJSAFsuJkLS0MMzDxAgMIRFYUgkDCAilIACjomipC0gA3ZgqIAG3IgAaKjSIABzYqiaNI0LQuYfyeIASgcvYCOocQCJTJTEtCuRLKYrgYrkZK5BiqiZGYLgtK4biZC4BysIwZJBHYchxJQJBJkELSysgcgRvQKipD0xqqOmrg+Mq0KuCmqQoq4OQuBCrg6KoyytJosjEoY2QkpS3iAFkgMqRgiWzURXwuh09QQG7LHIe7tQORwIToN64wevUDQoWlbt+jgLu3CIXp+97zgOFNvruuNvCYLD4SWVgwjOJYED2K16ADZjHO6UVUcSFBxgDJDqVG8ZSZtEFgwx48pSZkQTlEaToaQX7pwghCuoHElYOg2machDgpEc8ZyCB5CgbcXAZ0IbBSHUMAED6nBCDAdA2A1wcQAAE2YAAzOjKqkDhCeQ8nMO6BGvyl0RZZaeXr0RDHRptT2fvliW7dlSBaYHMW3Cw6ACEj7AxJ6tNBAQWAo+jgRCBxlAxDYagwDgI3TfN0LLetkPnHYDtXG7APNCDu2OWrgCPe5aufdEOvYNdrrw19iNYJltQWc7qsK9YUVzmHoHznrq3MLF7w6GH6u7hBSXh8VFmZ6lNwYHM0xVaoMAolIdB8EKaBU8gSOok88Q8CznPjbNi3YIH0fn7NDCx7ZgWZOwfrRhAWK2KsCKilNKMgqKBgACoABkZoMWCjIKQHFWpAA)
+
+And this is how most keyboards work. There are some special keys–Shift, Ctrl, Alt, etc might be on their very own line, since we want to detect key combos. And better keyboards can detect multiple keys being pressed at once (N-key rollover), <s>which I think they do by having a completely separate wire to each key</s> which multiple people tell me they do with a diode next to each key.
+
+For the above project, I used:
+
+- Three index cards
+- A hole punch
+- Scissors
+- A ruler
+- A pen (NOT a pencil, since graphite is conductive)
+- 9 screws, 9 nuts, and 18 washes. I selected #6 American Wire Gauge, which is about 4mm thickness
+- [Copper tape](https://www.amazon.com/dp/B07JNJCNVT)
+
+Did this work perfectly? Definitely not.
+
+- On some keyboards I’ve made, you have to press quite hard.
+- My multimeter takes a while to register a press. I think a microcontroller would be better.
+- You have to attach the terminals carefully. I think what’s going on is that you can actually put the screw *exactly* through the center of the washer which is actually making contact with the strips, so that only the washer is attached, and the screw doesn’t rub against the washer.
+- It’s of course fairly easy to mis-align anything. This is pretty easy to fix with care. I used the “spacer” grid to draw the centerpoint of the printed letters.
+- The screw heads are a bit thick, so it’s hard to press the keys in the column/row next to the screws. A piece of backing cardboard might fix this.
+
+This was my third attempt. Here’s the second, using aluminium foil. It worked at least as well, maybe better, but it was harder to make. I just taped the foil down, taking care not to cover the contact points. I am told the aluminium will gradually oxidize, making it non-conductive.
+
+<figure class="wp-block-gallery has-nested-images columns-5 is-cropped wp-block-gallery-1 is-layout-flex wp-block-gallery-is-layout-flex" markdown="1">
+
+[](https://blog.za3k.com/wp-content/uploads/2023/06/aluminium_parts-scaled.jpg)
+
+[](https://blog.za3k.com/wp-content/uploads/2023/06/aluminium_layers-scaled.jpg)
+
+[](https://blog.za3k.com/wp-content/uploads/2023/06/aluminium_03-scaled.jpg)
+
+[](https://blog.za3k.com/wp-content/uploads/2023/06/aluminium_01-scaled.jpg)
+
+[](https://blog.za3k.com/wp-content/uploads/2023/06/aluminium_02-scaled.jpg)
+
+[](https://blog.za3k.com/wp-content/uploads/2023/06/side_view-scaled.jpg)
+
+</figure>
+
+And here’s one using graphite from drawing hard with a #2 pencil.. Graphite, it turns out, works terribly, and I couldn’t read a signal halfway down the index card. Despite what people have told me, I’m not yet convinced you can make a conductive wire out of it.
+
+<figure class="wp-block-gallery has-nested-images columns-default is-cropped wp-block-gallery-2 is-layout-flex wp-block-gallery-is-layout-flex" markdown="1">
+
+[](https://blog.za3k.com/wp-content/uploads/2023/06/graphite_parts-scaled.jpg)
+
+[](https://blog.za3k.com/wp-content/uploads/2023/06/graphite_done-scaled.jpg)
+
+</figure>
--- /dev/null
+---
+author: admin
+categories:
+- Non-Technical
+- Technical
+date: 2022-10-12 15:45:27-07:00
+markup: html
+source: wordpress
+tags:
+- eink
+- electronics
+- physical
+- prototype
+title: "e-ink \u201Claptop\u201D"
+updated: 2022-10-13 10:30:55-07:00
+wordpress_id: 801
+wordpress_slug: e-ink-laptop
+---
+I’ve been prototyping an e-ink laptop.
+
+[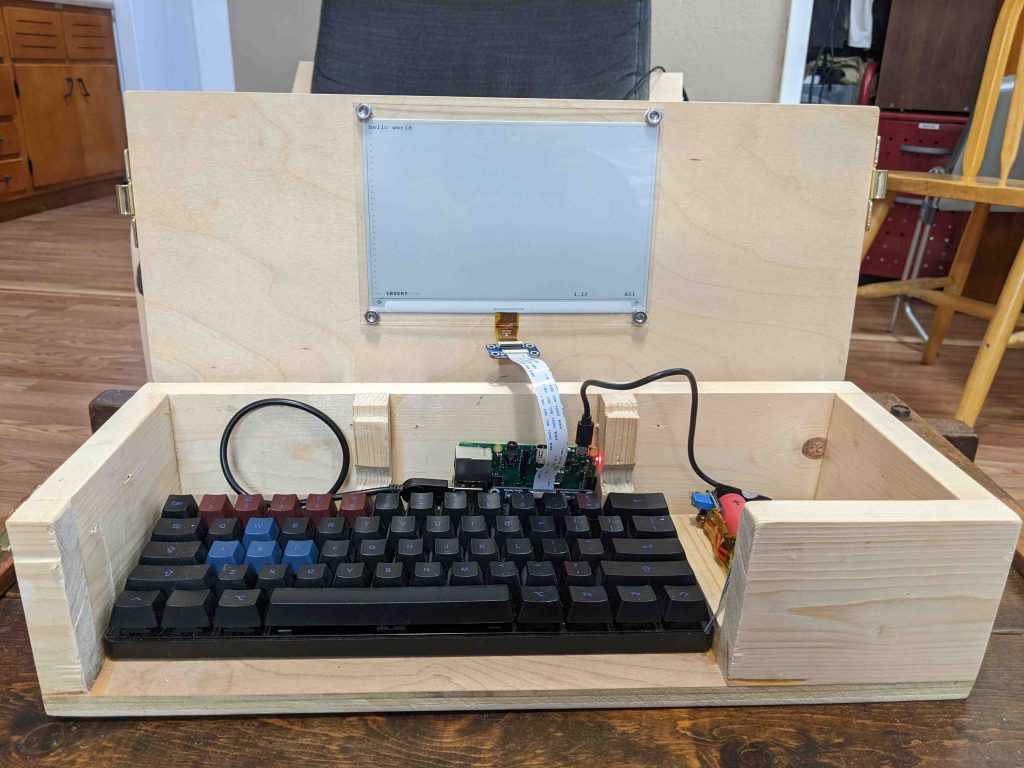](https://blog.za3k.com/wp-content/uploads/2022/10/front_view_open-scaled.jpg)
+
+[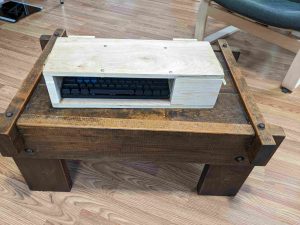](https://blog.za3k.com/wp-content/uploads/2022/10/front_view-scaled.jpg)
+
+I’m not the first, there have been many other such devices before. I came up with the idea independently, but the specifics are heavily inspired by the [Ultimate Writer](https://alternativebit.fr/posts/ultimate-writer/) by NinjaTrappeur in 2018. Similar to him, my use case is typing without distractions, and reading books. E-ink displays are quite slow to update, so I don’t think it can serve as a general purpose computer. Here’s a video of it in action. It operates at one frame per second.
+
+<video controls="" src="https://za3k.com/archive/eink_typing1.mp4"></video>
+
+The electronics are not fully done. They need better secured, and I’m going to redo the cabling and power back.
+
+[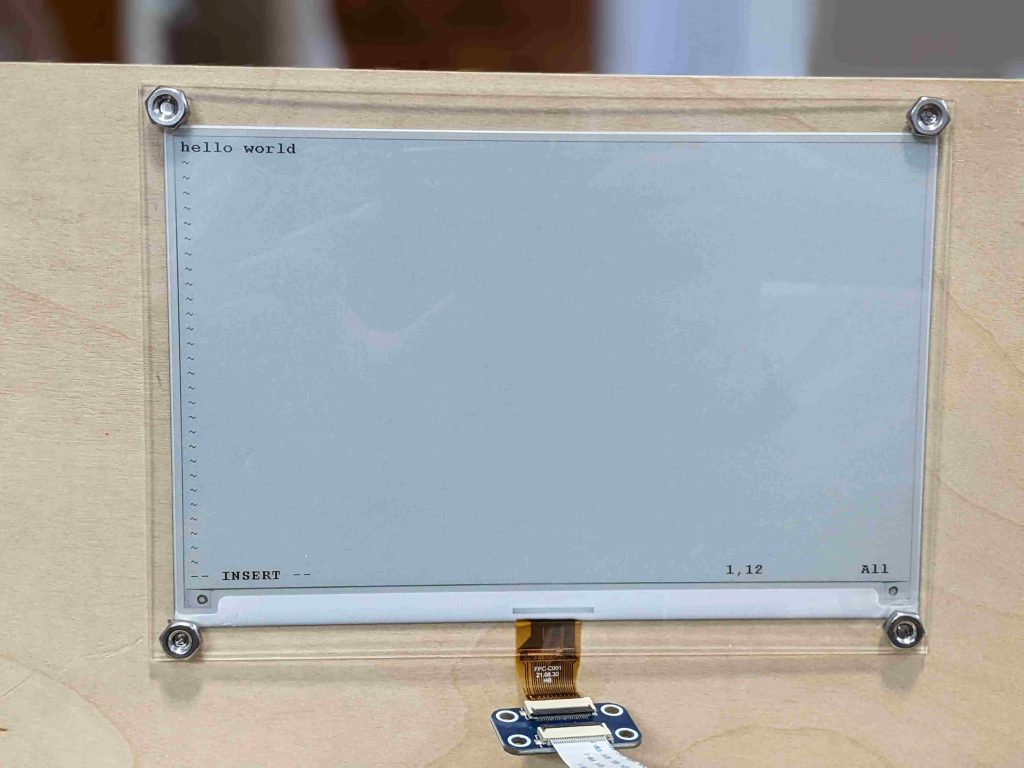](https://blog.za3k.com/wp-content/uploads/2022/10/screen_closeup-scaled.jpg)
+
+[](https://blog.za3k.com/wp-content/uploads/2022/10/early_garbage-crop-scaled.jpg)
+
+[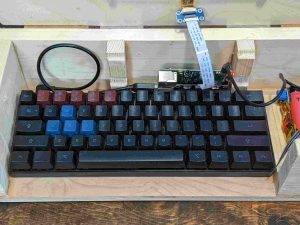](https://blog.za3k.com/wp-content/uploads/2022/10/keyboard_closeup-scaled.jpg)
+
+[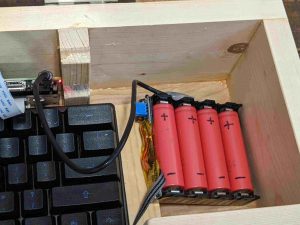](https://blog.za3k.com/wp-content/uploads/2022/10/battery_back_closeup-scaled.jpg)
+
+[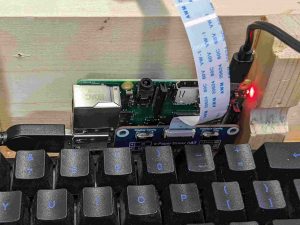](https://blog.za3k.com/wp-content/uploads/2022/10/pi_closeup-scaled.jpg)
+
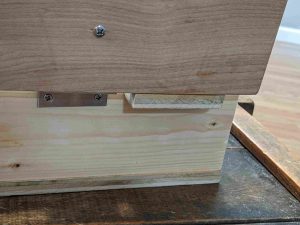
+I’m not the best woodworker, but I’m slowly learning. Here are pictures of case and lid action.
+
+[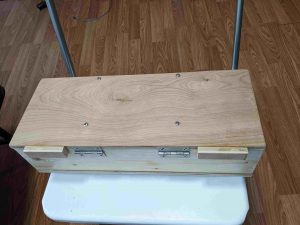](https://blog.za3k.com/wp-content/uploads/2022/10/added_back_stops-scaled.jpg)
+
+[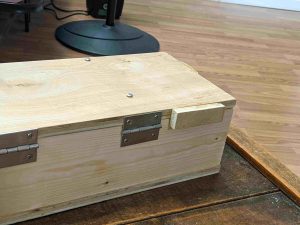](https://blog.za3k.com/wp-content/uploads/2022/10/back_stop-scaled.jpg)
+
+[](https://blog.za3k.com/wp-content/uploads/2022/10/back_stop_action-scaled.jpg)
+
+[](https://blog.za3k.com/wp-content/uploads/2022/10/hinge-scaled.jpg)
+
+[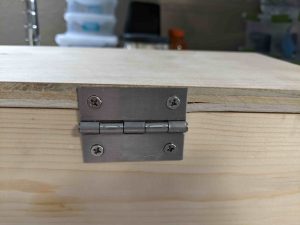](https://blog.za3k.com/wp-content/uploads/2022/10/hinge_crack-scaled.jpg)
+
+On the software end, shout outs to:
+
+- the creator of the [ultimate-writer](https://github.com/NinjaTrappeur/ultimate-writer) software, NinjaTrappeur, who has been encouraging (and explained the right way to rewrite the stack, if you wanted to today).
+- Ben Krasnow, who made a [video](https://www.youtube.com/watch?v=MsbiO8EAsGw&ab_channel=AppliedScience) about how to hack partial refresh on an e-ink display.
+
+There’s a few things I’d like to polish still–even as a prototype this isn’t fully done.
+
+- The raspberry pi and battery pack are currently sitting loose. They need secured, especially since they can fall out the open front.
+- The software has some major problems. It doesn’t support Control-C, etc in linux, a must, and it doesn’t update the screen at boot until you press a key, which would be nice to fix.
+- There’s no power switch. Right now you have to unplug it manually.
+- I’d like to add a carrying handle.
+- I’d like to tuck away the electronics behind a panel. They’re ugly.
+- The wood looks rough in a few places. I want to hide some splintered wood, screw holes, etc.
+- The USB cables have too much stress on them. I need to make a little more room in the wood, and use a right-angled connector in one place.
+
+There’s also no default software, but that’s a feature. A prototype is for figuring out how I want the interface to work, and what I want it to do.
+
+Parts list
+
+- [7.5 inch e-ink screen](https://www.waveshare.com/7.5inch-e-paper-hat.htm) from Waveshare (not particularly good) – $60
+- Raspberry Pi 3 (Pi Zero, etc also work with no changes) – $35 (but unavailable)
+- microsd card – $7
+- Plywood and boards, wood glue – $15
+- [Plexiglass](https://www.amazon.com/gp/product/B088LXM1P1) (to cover screen) – $10
+- Bolts, washers, and nuts to secure it. – $5
+- Circular [window latch](https://www.amazon.com/dp/B000CSGD1U) x2 – $8 (or use $10 smaller [version](https://www.amazon.com/dp/B09ZTLLC6K))
+- Hinge x2 – $2
+- Total: $142
+
+Power budget (at 5V):
+
+- Keyboard: 500mW. Other USB keyboards use zero to within my measurement abilities.
+- Screen: 0-250mW when updating. Hard to measure.
+- Pi 3: 2000mW. I have the wifi chip enabled (the default) but I’m not actively connected to wifi.
+- Pi Zero W: 650mW
+
+A real-life test showed 5-6 hour battery life. Theory says (13Wh/battery \* 4 batteries / 2.7 watts)=20 hours battery life. I’m investigating the discrepancy. In theory, swapping for a Pi Zero W and a better keyboard would give 72-hour battery life.
--- /dev/null
+---
+author: admin
+categories:
+- Technical
+date: 2023-11-07 07:33:14-07:00
+markup: html
+source: wordpress
+tags:
+- graphics
+- hack-a-day
+- raytracing
+title: 'Hack-A-Day, Day 06: Raytracing Redux (realtime video)'
+updated: 2023-11-11 11:39:03-07:00
+wordpress_id: 1152
+wordpress_slug: hack-a-day-day-06
+---
+Today’s update is a short one. I ported my raytracer from [day 02](https://blog.za3k.com/hack-a-day-day-2-raytracing/), to the Nvidia GPU: [ha3k-06-raytracer](https://github.com/za3k/ha3k-06-raytracer)
+
+The visuals are pretty much the same. Incidentally I discovered the striations on the ground disappear if we increase the floating point precision.
+
+<figure class="wp-block-gallery has-nested-images columns-default is-cropped wp-block-gallery-1 is-layout-flex wp-block-gallery-is-layout-flex" markdown="1">
+
+[](https://blog.za3k.com/wp-content/uploads/2023/11/v15b.png)
+
+[](https://blog.za3k.com/wp-content/uploads/2023/11/v16.png)
+
+</figure>
+
+Render on the GPU is 30x faster (0.05 fps -> 3 fps). That’s still not very fast.
+
+<s>I didn’t get video working yesterday, or anything else visually new. I will call this one a failure overall, because I have nothing interesting to show off.</s> I learned stuff and made progress though, so it’s not so bad.
+
+Here’s a working video!
+
+<iframe allow="accelerometer; autoplay; clipboard-write; encrypted-media; gyroscope; picture-in-picture; web-share" allowfullscreen="" frameborder="0" height="315" src="https://www.youtube.com/embed/y4TcrxRg4aw?si=ca7wFptQ99gffghI" title="YouTube video player" width="560"></iframe>
--- /dev/null
+---
+author: admin
+categories:
+- Non-Technical
+- Technical
+date: 2022-11-25 21:08:03-07:00
+markup: html
+source: wordpress
+tags:
+- hack-a-day
+- november
+- throwaway
+- time
+title: 'Hack-A-Day: Hack-A-Clock'
+updated: 2022-11-25 21:08:03-07:00
+wordpress_id: 934
+wordpress_slug: hack-a-day-hack-a-clock
+---
+Thursday’s project was [Hack-A-Clock](https://tilde.za3k.com/hackaday/clock/) ([demo](https://tilde.za3k.com/hackaday/clock/), [source](https://github.com/za3k/day24_clock)). It is a decimal time clock, displaying the time in revolutionary french time (minus their weird calendar).
+
+[](https://tilde.za3k.com/hackaday/clock/)
+
+This is another “phone it in” project but I think it would have been okay with more accompanying explanation and better styling.
--- /dev/null
+---
+author: admin
+categories:
+- Non-Technical
+- Technical
+date: 2022-11-19 21:04:04-07:00
+markup: html
+source: wordpress
+tags:
+- audio
+- hack-a-day
+- november
+- social
+- throwaway
+- video
+- webrtc
+title: 'Hack-A-Day: Hack-A-Hang'
+updated: 2022-11-19 21:13:00-07:00
+wordpress_id: 918
+wordpress_slug: hack-a-day-hack-a-hang
+---
+It’s november, and I’ve decided this month that I’m going to do 30 projects in 30 days. It’s an all-month hack-a-thon!
+
+Today’s project is [Hack-A-Hang](https://tilde.za3k.com/hackaday/hang/) ([demo](https://tilde.za3k.com/hackaday/hang/), [source](https://github.com/za3k/day19_hang)). It’s a place to hang out. It has text chat, video, and audio.
+
+<b style="font-size:30px">Hack-A-Hang is NOT WORKING.</b>
+
+Unfortunately while everything works great on my machine, there’s a bad problem in production, and I ran out of time on this one. I’ll try to get it fixed before the end of the month if it’s easy.
+
+[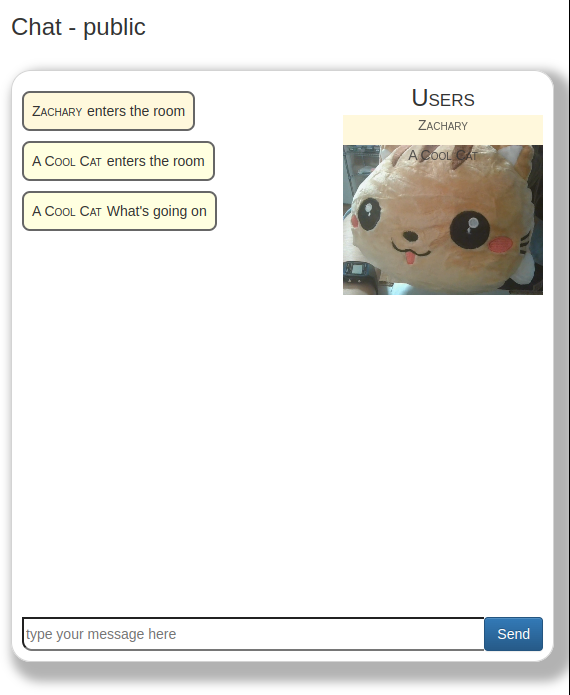](https://tilde.za3k.com/hackaday/hang/)
+
+Hoo boy, this was one of the technically hardest ones so far. WebRTC is no joke. And not hard in a way where you have to think, hard in a way where the debugging tools are terrible. (Drag and drop was another tough one)
--- /dev/null
+---
+author: admin
+categories:
+- Technical
+date: 2021-06-11 13:28:52-07:00
+markup: html
+source: wordpress
+tags:
+- debian
+- linux
+- system administration
+title: Migrating an existing debian installation to encrypted root
+updated: 2021-06-11 18:06:48-07:00
+wordpress_id: 606
+wordpress_slug: migrating-an-existing-debian-installation-to-encrypted-root
+---
+In this article, I migrate an existing debian 10 buster release, from an unencrypted root drive, to an encrypted root. I used a second hard drive because it’s safer–this is NOT an in-place migration guide. We will be encrypting / (root) only, not /boot. My computer uses UEFI. This guide **is specific to debian**–I happen to know these steps would be different on Arch Linux, for example. They probably work great on a different debian version, and might even work on something debian-based like Ubuntu.
+
+In [part 2](https://blog.za3k.com/encrypted-root-on-debian-part-2-unattended-boot/), I add an optional extra where root decrypts using a special USB stick rather than a keyboard passphrase, for unattended boot.
+
+Apologies if I forget any steps–I wrote this after I did the migration, and not during, so it’s not copy-paste.
+
+Q: Why aren’t we encrypting /boot too?
+
+1. Encrypting /boot doesn’t add much security. Anyone can guess what’s on my /boot–it’s the same as on everyone debian distro. And encrypting /boot doesn’t prevent tampering–someone can easily replace my encrypted partition by an unencrypted one without my noticing. Something like [Secure Boot](https://www.rodsbooks.com/efi-bootloaders/secureboot.html) would resist tampering, but still doesn’t require an encrypted /boot.
+2. I pull a special trick in [part 2](https://blog.za3k.com/encrypted-root-on-debian-part-2-unattended-boot/). Grub2’s has new built-in encryption support, which is what would allow encrypting /boot. But grub2 can’t handle keyfiles or keyscripts as of writing, which I use.
+
+**How boot works**
+
+For anyone that doesn’t know, here’s how a typical boot process works:
+
+1. Your computer has built-in firmware, which on my computer meets a standard called UEFI. On older computers this is called BIOS. The firmware is built-in, closed-source, and often specific to your computer. You can replace it with something open-source if you wish.
+2. The firmware has some settings for what order to boot hard disks, CD drives, and USB sticks in. The firmware tries each option in turn, failing and using the next if needed.
+3. At the beginning of each hard disk is a *partition table*, a VERY short info section containing information about what partitions are on the disk, and where they are. There are two partition table types: MBR (older) and GPT (newer). UEFI can only read GPT partition tables. The first thing the firmware does for each boot disk is read the partition table, to figure out which partitions are there.
+4. For UEFI, the firmware looks for an “EFI” partition on the boot disk–a special partition which contains bootloader executables. EFI always has a FAT filesystem on it. The firmware runs an EFI executable from the partition–which one is configured in the UEFI settings. In my setup there’s only one executable–the grub2 bootloader–so it runs that without special configuration.
+5. Grub2 starts. The first thing Grub2 does is… read the partition table(s) again. It finds the /boot partition, which contains grub.cfg, and reads grub.cfg. (There is a file in the efi partition right next to the executable, which tells grub where and how to find /boot/grub.cfg. This second file is confusingly also called grub.cfg, so let’s forget it exists, we don’t care about it).
+6. Grub2 invokes the Linux Kernel specified in grub.cfg, with the options specified in grub.cfg, including the an option to use a particular initramfs. Both the Linux kernel and the initramfs are also in /boot.
+7. Now the kernel starts, using the initramfs. initramfs is a tiny, compressed, read-only filesystem only used in the bootloading process. The initramfs’s only job is to find the real root filesystem and open it. grub2 is pretty smart/big, which means initramfs may not have anything left to do on your system before you added encryption. **If you’re doing decryption, it happens here.** This is also how Linux handles weird filesystems (ZFS, btrfs, squashfs), some network filesystems, or hardware the bootloader doesn’t know about. At the end of the process, we now have switched over to the REAL root filesystem.
+8. The kernel starts. We are now big boys who can take care of ourselves, and the bootloading process is over. The kernel always runs /bin/init from the filesystem, which on my system is a symlink to systemd. This does all the usual startup stuff (start any SSH server, print a bunch of messages to the console, show a graphical login, etc).
+
+**Setting up the encrypted disk**
+
+First off, I used TWO hard drives–this is not an in-place migration, and that way nothing is broken if you mess up. One disk was in my root, and stayed there the whole time. The other I connected via USB.
+
+Here’s the output of `gdisk -l` on my original disk:
+
+```
+Number Start (sector) End (sector) Size Code Name
+ 1 2048 1050623 512.0 MiB EF00 # EFI, mounted at /boot/efi
+ 2 1050624 354803711 168.7 GiB 8300 # ext4, mounted at /
+ 3 354803712 488396799 63.7 GiB 8200 # swap
+```
+
+Here will be the final output of `gdisk -l` on the new disk:
+
+```
+Number Start (sector) End (sector) Size Code Name
+ 1 2048 526335 256.0 MiB EF00 efi # EFI, mounted at /boot/efi
+ 2 1050624 135268351 64.0 GiB 8200 swap # swap
+ 3 135268352 937703054 382.6 GiB 8300 root_cipher # ext4-on-LUKS. ext4 mounted at /
+ 4 526336 1050623 256.0 MiB 8300 boot # ext4, mounted at /boot
+```
+
+1. Stop anything else running. We’re going to do a “live” copy from the running system, so at least stop doing anything else. Also most of the commands in this guide need root (`sudo`).
+2. Format the new disk. I used `gdisk` and you must select a gpt partition table. Basically I just made everything match the original. The one change I need is to add a /boot partition, so grub2 will be able to do the second stage. I also added partition labels with the `c` gdisk command to all partitions: boot, root\_cipher, efi, and swap. I decided I’d like to be able to migrate to a larger disk later without updating a bunch of GUIDs, and filesystem or partition labels are a good method.
+3. Add encryption. I like filesystem-on-LUKS, but most other debian guides use filesystem-in-LVM-on-LUKS. You’ll enter your new disk password twice–once to make an encrypted partition, once to open the partition.
+ ```
+ cryptsetup luksFormat /dev/disk/by-partlabel/root_cipher
+ cryptsetup open /dev/disk-by-partlabel/root_cipher root
+ ```
+4. Make the filesystems. For my setup:
+ ```
+ mkfs.ext4 /dev/disk/by-partlabel/root
+ mkfs.ext4 /dev/disk/by-partlabel/boot
+ mkfs.vfat /dev/disk/by-partlabel/efi
+ ```
+5. Mount all the new filesystems at `/mnt`. Make sure everything (cryptsetup included) uses EXACTLY the same mount paths (ex /dev/disk/by-partlabel/boot instead of /dev/sda1) as your final system will, because debian will examine your mounts to generate boot config files.
+ ```
+ mount /dev/disk/by-partlabel/root /mnt
+ mkdir /mnt/boot && mount /dev/disk/by-partlabel/boot /mnt/boot
+ mkdir /mnt/boot/efi && mount /dev/disk/by-partlabel/efi /mnt/boot/efi
+ mkdir /mnt/dev && mount --bind /dev /mnt/dev # for chroot
+ mkdir /mnt/sys && mount --bind /sys /mnt/sys
+ mkdir /mnt/proc && mount --bind /dev /mnt/proc
+ ```
+6. Copy everything over. I used `rsync -axAX`, but you can also use `cp -ax`. To learn what all these options are, read the man page. Make sure to keep the trailing slashes in the folder paths for rsync.
+ ```
+ rsync -xavHAX / /mnt/ --no-i-r --info=progress2
+ rsync -xavHAX /boot/ /mnt/boot/
+ rsync -xavHAX /boot/efi/ /mnt/boot/efi/
+ ```
+7. Chroot in. You will now be “in” the new system using your existing kernel.
+ `chroot /mnt`
+8. Edit /etc/crypttab. Add:
+ `root PARTLABEL=root_cipher none luks`
+9. Edit /etc/fstab. Mine looks like this:
+ ```
+ /dev/mapper/root / ext4 errors=remount-ro 0 1
+ PARTLABEL=boot /boot ext4 defaults,nofail 0 1
+ PARTLABEL=efi /boot/efi vfat umask=0077,nofail
+ PARTLABEL=swap none swap sw,nofail 0 0
+ tmpfs /tmp tmpfs mode=1777,nosuid,nodev 0 0
+ ```
+10. Edit /etc/default/grub. On debian you don’t need to edit `GRUB_CMDLINE_LINUX`.
+ ```
+ GRUB_DISABLE_LINUX_UUID=true
+ GRUB_ENABLE_LINUX_PARTLABEL=true
+ ```
+11. Run `grub-install`. This will install the bootloader to efi. I forget the options to run it with… sorry!
+12. Run `update-grub` (with no options). This will update /boot/grub.cfg so it knows how to find your new drive. You can verify the file by hand if you know how.
+13. Run `update-initramfs` (with no options). This will update the initramfs so it can decrypt your root drive.
+14. If there were any warnings or errors printed in the last three steps, something is wrong. Figure out what–it won’t boot otherwise. Especially make sure your /etc/fstab and /etc/crypttab *exactly* match what you’ve already used to mount filesystems.
+15. Exit the chroot. Make sure any changes are synced to disk (you can unmount everything under /mnt in reverse order to make sure if you want)
+16. Shut down your computer. Remove your root disk and boot from the new one. It should work now, asking for your password during boot.
+17. Once you boot successfully and verify everything mounted, you can remove the `nofail` from /etc/fstab if you want.
+18. (In my case, I also set up the swap partition after successful boot.) Edit: Oh, also don’t use unencrypted swap with encrypted root. That was dumb.
--- /dev/null
+---
+author: admin
+categories:
+- Non-Technical
+date: 2014-12-01 12:19:47-07:00
+markup: html
+source: wordpress
+tags:
+- finance
+- hacks
+title: Money orders
+updated: 2014-12-02 13:51:00-07:00
+wordpress_id: 84
+wordpress_slug: money-orders
+---
+[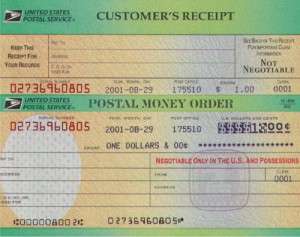](https://blog.za3k.com/wp-content/uploads/2014/12/Figure6.jpg)
+
+Allow me to introduce you all to the postal money order. For $1.50, you can get the equivalent of a cashier’s check from the post office. It can only be cashed by whoever you make it out to, and it’s basically accepted as cash by every corporation. You can also just give someone a blank one, although that’s riskier to carry around for the obvious reasons.
+
+I was tired of checks bouncing. I can’t be bothered to make sure my account remains such-and-such, which means it happens sometimes, especially times like now when I’m poor. So I asked my landlord if I could pay by money order–he’d never heard of them before, but seemed okay with it when I explained (he’s a really good guy!).
+
+I went down to the bank and got out $2750, and headed to the post office. I asked for 9 money orders, each for $303. The postal worker really only made a couple funny faces about me being weird, although my friend said she was pretty loud about my walking out with that much cash-equivalent, it went pretty well. And I immediately endorsed all the money orders so now they can lie around the hose safely.
+
+Also, they come with attachable receipts (shown in the picture) in case you lose the check and need a replacement, so that’s nice.
--- /dev/null
+---
+author: admin
+categories:
+- Technical
+date: 2020-05-12 14:00:28-07:00
+markup: html
+source: wordpress
+tags:
+- immutable
+- linux
+- postmortem
+- storage
+title: 'Postmortem: bs-store'
+updated: 2020-05-17 12:52:32-07:00
+wordpress_id: 523
+wordpress_slug: postmortem-bs-store
+---
+Between 2020-03-14 and 2020-12-03 I ran an experimental computer storage setup. I movied or copied 90% of my files into a content-addressable storage system. I’m doing a writeup of why I did it, how I did it, and why I stopped. My hope is that it will be useful to anyone considering using a similar system.
+
+The assumption behind this setup, is that 99% of my files never change, so it’s fine to store only one, static copy of them. (Think movies, photos… they’re most of your computer space, and you’re never going to modify them). There are files you change, I just didn’t put them into this system. If you run a database, this ain’t for you.
+
+Because I have quite a lot of files and 42 drives (7 in my computer, ~35 in a huge media server chassis), there is a problem of how to organize files across drives. To explain why it’s a problem, let’s look at the two default approaches:
+
+- **One Block Device / RAID 0**. Use some form of system that unifies block devices, such as RAID0 or a ZFS’s striped vdevs. Writing files is very easy, you see a single 3000GB drive.
+ - Many forms of RAID0 use striping. Striping splits each file across all available drives. 42 drives could spin up to read one file (wasteful).
+ - You need all the drives mounted to read anything–I have ~40 drives, and I’d like a solution that works if I move and can’t keep my giant media server running. Also, it’s just more reassuring that nothing can fail if you can read each drive individually.
+- **JBOD / Just a Bunch of Disks**. Label each drive with a category (ex. ‘movies’), and mount them individually.
+ - It’s hard to aim for 100% (or even >80%) drive use. Say you have 4x 1000GB drives, and you have 800GB movies, 800GB home video footage, 100GB photographs, and 300GB datasets. How do you arrange that? One drive per dataset is pretty wasteful, as everything fits on 3. But, with three drives, you’ll need to split at least one dataset across drives. Say you put together 800GB home video and 100GB photographs. If you get 200GB more photographs, do you split a 300 GB collection across drives, or move the entire thing to another drive? It’s a lot of manual management and shifting things around for little reason.
+
+Neither approach adds any redundancy, and 42 drives is a bit too many to deal with for most things. Step 1 is to split the 42 drives into 7 ZFS vdevs, each with 2-drive redundancy. That way, if a drive fails or there is a small data corruption (likely), everything will keep working. So now we only have to think about accessing 7 drives (but keep in mind, many physical drives will spin up for each disk access).
+
+The ideal solution:
+
+- Will not involve a lot of manual management
+- Will fill up each drive in turn to 100%, rather than all drives at an equal %.
+- Will deduplicate identical content (this is a “nice to have”)
+- Will only involve accessing one drive to access one file
+- Will allow me to get and remove drives, ideally across heterogenous systems.
+
+I decided a content-addressable system was ideal for me. That is, you’d look up each file by its hash. I don’t like having an extra step to access files, so files would be accessed by symlink–no frontend program. Also, it was important to me that I be able to transparently swap out the set of drives backing this. I wanted to make the content-addressable system basically a set of 7 content-addressable systems, and somehow wrap those all into one big content-addressable system with the same interface. Here’s what I settled on:
+
+- (My drives are mounted as /zpool/bs0, /zpool/bs1, … /zpool/bs6)
+- Files will be stored in each pool in turn by hash. So my movie ‘cat.mpg’ with sha hash ‘8323f58d8b92e6fdf190c56594ed767df90f1b6d’ gets stored in /zpool/bs0/83/23/f58d8b9 \[shortened for readability\]
+- Initially, we just copy files into the content-addressable system, we don’t delete the original. I’m cautious, and I wanted to make everything worked before getting rid of the originals.
+- To access a file, I used read-only unionfs-fuse for this. This checks each of /zpool/bs{0..6}/\<hash\> in turn. So in the final version, /data/movies/cat.mpg would be a symlink to ‘/bs-union/83/23/f58d8b9’
+- We store some extra metadata on the original file (if not replaced by a symlink) and the storied copy–what collection it’s part of, when it was added, how big it is, what it’s hash is, etc. I chose to use xattrs.
+
+The plan here is that it would be really easy to swap out one backing blockstore of 30GB, for two of 20GB–just copy the files to the new drives and add it to the unionfs.
+
+Here’s what went well:
+
+- No problems during development–only copying files meant it was easy and safe to debug prototypes.
+- Everything was trivial to access (except see note about mounting disks below)
+- It was easy to add things to the system
+- Holding off on deleting the original content until I was 100% out of room on my room disks, meant it was easy to migrate off of, rather risk-free
+- Running the entire thing on top of zfs ZRAID2 was the right decision, I had no worries about failing drives or data corruption, despite a lot of hardware issues developing at one point.
+- My assumption that files would never change was correct. I made the unionfs filesystem read-only as a guard against error, but it was never a problem.
+- Migrating off the system went smoothly
+
+Here are the implementation problems I found
+
+- I wrote the entire thing as bash scripts operating directly on files, which was OK for access and putting stuff in the store, but just awful for trying to get an overview of data or migrating things. I definitely should have used a database. I maybe should have used a programming language.
+- Because there was no database, there wasn’t really any kind of regular check for orphans (content in the blobstore with no symlinks to it), and other similar checks.
+- unionfs-fuse suuucks. Every union filesystem I’ve tried sucks. Its read bandwidth is much lower than the component devices (unclear, probably), it doesn’t cache where to look things up, and it has zero xattrs support (can’t read xattrs from the underlying filesystem).
+- gotcha: zfs xattrs waste a lot of space by default, you need to reconfigure the default.
+
+But the biggest problem was disk access patterns:
+
+- I thought I could cool 42 drives spinning, or at least a good portion of them. This was WRONG by far, and I am not sure how possible it is in a home setup. To give you an idea how bad this was, I had to write a monitor to shut off my computer if the drives went above 60C, and I was developing fevers in my bedroom (where the server is) from overheating. Not healthy.
+- unionfs has to check each backing drive. So we see 42 drives spin up. I have ideas on fixing this, but it doesn’t deal with the other problems
+- To fix this, you could use double-indirection.
+ - Rather than pointing a symlink at a unionfs: /data/cat.mpg -> /bs-union/83/23/f58d8b9 (which accesses /zpool/bs0/83/23/f58d8b9)
+ - Point a symlink at another symlink that points directly to the data: /data/cat.mpg -> /bs-indirect/83/23/f58d8b9 -> /zpool/bs0/83/23/f58d8b9
+- The idea is that backing stores are kinda “whatever, just shove it somewhere”. But, actually it would be good to have a collection in one place–not only to make it easy to copy, but to spin up only one drive when you go through everything in a collection. It might even be a good idea to have a separate drive for more frequently-accessed content. This wasn’t a huge deal for me since migrating existing content meant it coincidentally ended up pretty localized.
+- Because I couldn’t spin up all 42 drives, I had to keep a lot of the array unmounted, and mount the drives I needed into the unionfs manually.
+
+So although I could have tried to fix things with double-indirection, I decided there were some other disadvantages to symlinks: estimating sizes, making offsite backups foolproof. I decided to migrate off the system entirely. The migration went well, although it required running all the drives at once, so some hardware errors popped up. I’m currently on a semi-JBOD system (still on top of the same 7 ZRAID2 devices).
+
+Hopefully this is useful to someone planning a similar system someday. If you learned something useful, or there are existing systems I should have used, feel free to leave a comment.
--- /dev/null
+---
+author: admin
+categories:
+- Non-Technical
+date: 2023-06-07 09:38:53-07:00
+markup: html
+source: wordpress
+tags:
+- crafts
+- dungeons and dragons
+- feelies
+title: Scroll Props
+updated: 2023-06-07 09:38:53-07:00
+wordpress_id: 1040
+wordpress_slug: scroll-props
+---
+Infocom introduced (AFAIK) the concept of feelies:
+
+> \[…\] Imaginative props and extras tied to the game’s theme—provided [copy protection](https://en.wikipedia.org/wiki/Copy_protection) against [copyright infringement](https://en.wikipedia.org/wiki/Copyright_infringement).[<sup>[45]</sup>](https://en.wikipedia.org/wiki/Infocom#cite_note-dyer19840506-45) Some games were unsolvable without the extra content provided with the boxed game. And because of the cleverness and uniqueness of the feelies, users rarely felt like they were an intrusion or inconvenience, as was the case with most of the other copy-protection schemes of the time.[<sup>[49]</sup>](https://en.wikipedia.org/wiki/Infocom#cite_note-49) Feelies also provided the player with a physical aspect to the gameplay of their text adventures, giving another dimension of strategy to what would other-wise just be a text parser.
+>
+> – Wikipedia (Infocom)
+
+I love to give out feelies for my D&D campaigns. Here are some lil handout props I made:
+
+[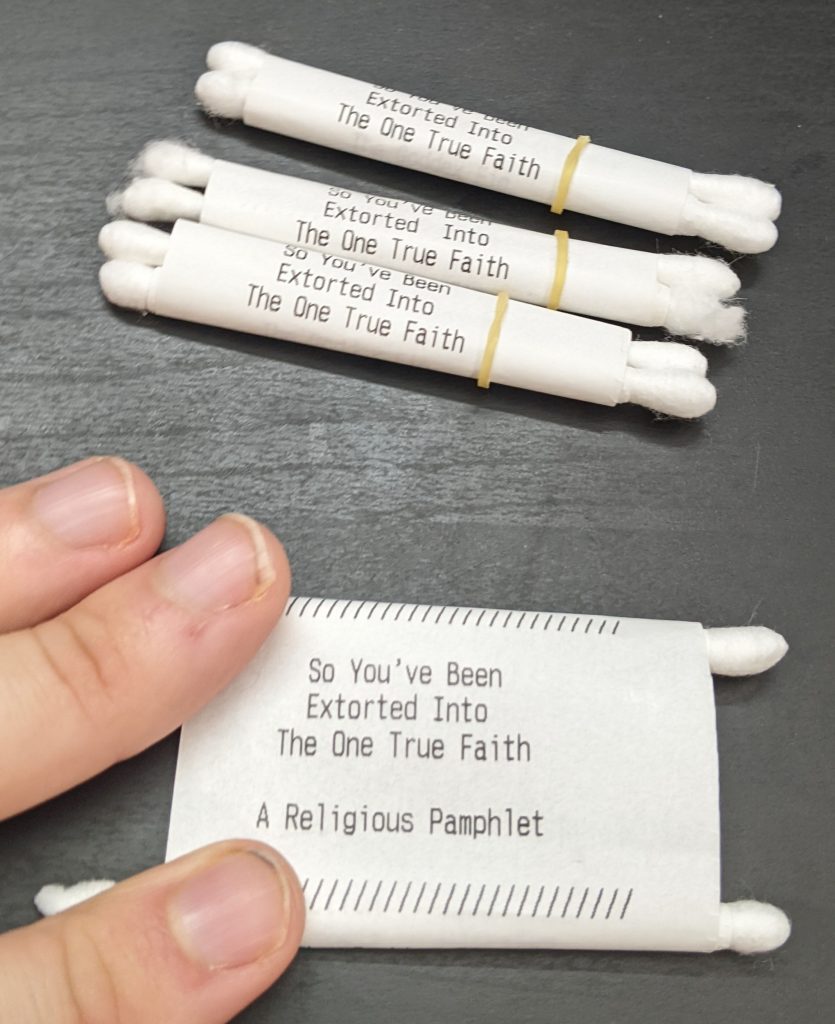](https://blog.za3k.com/wp-content/uploads/2023/06/scroll-crop.jpg)
+
+I used a receipt printer, q-tips, tape, and [orthodontic rubber bands](https://www.amazon.com/Orthodontic-Elastic-Rubberbands-Dreadlocks-Horse/dp/B00OSR1RBM).
--- /dev/null
+---
+author: admin
+categories:
+- Non-Technical
+- Technical
+date: 2014-11-21 19:20:29-07:00
+markup: html
+source: wordpress
+tags: []
+title: The Double Lives of Books
+updated: 2015-12-24 19:46:17-07:00
+wordpress_id: 46
+wordpress_slug: the-double-lives-of-books
+---
+Two forces pull at me: the desire to have few possessions and be able to travel flexibly, and the convenience of reading and referencing physical books. I discovered a third option: I have digital copies of all my books, so I can freely get rid of them at any time, or travel without inconvenience.
+
+So that’s where we start. Here’s where I went.
+
+I thought, if these books are just a local convenience for an online version, it’s more artistically satisfying to have some representation of that. So I printed up a card catalog of all my books, both the ones I have digital copies of and not:
+
+[](https://blog.za3k.com/wp-content/uploads/2014/11/sample_card.png)
+
+That’s what a card looks like. There’s information about the book up top, and a link in the form of a [QR code](http://en.wikipedia.org/wiki/QR_code "QR code") in the middle. The link downloads a PDF version of that book. Obviously being a programmer, the cards all all automatically generated.
+
+[](https://blog.za3k.com/wp-content/uploads/2014/11/book.jpg)
+
+For the books where I have a physical copy, I put the card in the book, and it feels like I’m touching the digital copy. My friends can pirate their own personal version of the book (saving me the sadness of lost lent-out books I’m sure we’ve all felt at times). And I just thing it looks darn neat. Some physical books I don’t have a digital version of, since the world is not yet perfect. But at least I can identify them at a glance (and consider sending them off to a service like [http://1dollarscan.com/](http://1dollarscan.com/))
+
+[](https://blog.za3k.com/wp-content/uploads/2014/11/catalog.jpg)
+
+And then, I have a box full of all the books I \*don’t\* have a physical copy of, so I can browse through them, and organize them into reading lists or recommendations. It’s not nearly as cool as the ones in books, but it’s sort of nice to keep around.
+
+And if I ever decide to get rid of a book, I can just check to make sure there’s a card inside, and move the card into the box, reassured nothing is lost, giving away a physical artifact I no longer have the ability to support.
+
+I sadly won’t provide a link to the library since that stuff is mostly pirated.
+
+Interesting technical problems encountered during this project (you can stop reading now if you’re not technically inclined):
+
+- Making sure each card gets printed exactly once, in the face of printer failures and updating digital collections. This was hard and took up most of my time, but it’s also insanely boring so I’ll say no more.
+- Command-line QR code generation, especially without generating intermediate files. I used rqrcode\_png in ruby. I can now hotlink link qr.png?text=Hello%20World and see any text I want, it’s great.
+- Printing the cards. This is actually really difficult to automate–I generate the cards in HTML and it’s pretty difficult to print HTML, CSS, and included images. I ended up using the ‘[wkhtmltoimage](http://wkhtmltopdf.org/ "wkhtmltoimage")‘ project, which as far as I can tell, renders the image somewhere internally using [webkit](http://en.wikipedia.org/wiki/WebKit "webkit") and screenshots it. There’s also a wkhtmltopdf available, which worked well but I couldn’t get to cooperate with index-card sized paper. Nothing else really seems to handle CSS, etc properly and as horrifying as the fundamental approach is, it’s both correct and well-executed. (They solved a number of problems with upstream patches to Qt for example, the sort of thing I love to hear)
+- The [zbarcam](http://zbar.sourceforge.net/ "zbarcam") software (for scanning QR codes among other digital codes) is just absolute quality work and I can’t say enough good things about it. Scanning cards back into the computer was one of the most pleasant parts of this whole project. It has an intuitive command UI using all the format options I want, and camera feedback to show it’s scanned QR codes (which it does very quickly).
+- [Future-proofed](http://en.wikipedia.org/wiki/Future_proof "Future-proofed") links to pirated books–the sort of link that usually goes down. I opted to use a [SHA256 hash](http://en.wikipedia.org/wiki/SHA-2 "SHA256 hash") (the mysterious numbers at the bottom which form a unique signature generated from the content of the book) and provide a small page on my website which gives you a download based on that. This is what the QR code links to. I was hoping there was some way to provide that without involving me, but I’m unaware of any service available. [Alice Monday](https://twitter.com/ali0mt "Alice Monday") suggested just typing the SHA hash into Google, which sounded like the sort of clever idea which might work. It doesn’t.
--- /dev/null
+---
+author: admin
+categories:
+- Technical
+date: 2021-07-10 21:36:51-07:00
+markup: html
+source: wordpress
+tags:
+- compression
+- formats
+- gzip
+- informative
+title: Understanding gzip
+updated: 2021-07-11 18:25:09-07:00
+wordpress_id: 668
+wordpress_slug: understanding-gzip-2
+---
+Let’s take a look at the gzip format. Why might you want to do this?
+
+1. Maybe you’re curious how gzip works
+2. Maybe you’re curious how DEFLATE works. DEFLATE is the “actual” compression method inside of gzip. It’s also used in zip, png, git, http, pdf… the list is pretty long.
+3. Maybe you would like to write a gzip/DEFLATE decompressor. (A compressor is more complicated–understanding the format alone isn’t enough)
+
+Let’s work a few examples and look at the format in close detail. For all these examples, I’m using GNU gzip 1.10-3 on an x86\_64 machine.
+
+I recommend checking out the linked resources below for a deeper conceptual overview if you want to learn more. That said, these are the only worked examples of gzip and/or DEFLATE of which I’m aware, so they’re a great companion to one another. In particular, you may want to learn what a prefix code is ahead of time.
+
+References:
+\[1\] [RFC 1951](https://www.rfc-editor.org/rfc/rfc1951.txt), DEFLATE standard, by Peter Deutsch
+\[2\] [RFC 1952](https://www.rfc-editor.org/rfc/rfc1952.txt), gzip standard, by Peter Deutsch
+\[3\] [infgen](https://github.com/madler/infgen), by Mark Adler (one of the zlib/gzip/DEFLATE authors), a tool for dis-assembling and printing a gzip or DEFLATE stream. I found this useful in figuring out the endian-ness of bitfields, and somewhat in understanding the dynamic huffman decoding process. Documentation is [here](https://github.com/madler/infgen/blob/master/infgen.c).
+\[4\] [An explanation of the ‘deflate’ algorithm](https://zlib.net/feldspar.html) by Antaeus Feldspar. A great conceptual overview of LZ77 and Huffman coding. **I recommend reading this *before* reading my DEFLATE explanation.**
+\[5\] [LZ77](https://en.wikipedia.org/wiki/LZ77_and_LZ78) compression, Wikipedia.
+\[6\] [Prefix-free codes](https://en.wikipedia.org/wiki/Prefix_code) generally and [Huffman](https://en.wikipedia.org/wiki/Huffman_coding)‘s algorithm specifically
+\[7\] After writing this, I learned about [puff.c](https://github.com/madler/zlib/blob/master/contrib/puff/puff.c), a reference (simple) implementation of a DEFLATE decompressor by Mark Adler.
+
+## Gzip format: Basics and compressing a stream
+
+Let’s take a look at our first example. If you’re on Linux, feel free to run the examples I use as we go.
+
+```
+echo "hello hello hello hello" | gzip
+```
+
+The bytes gzip outputs are below. You can use *xxd* or any other hex dump tool to view binary files. Notice that the original is 24 bytes, while the compressed version is 29 bytes–gzip is not really intended for data this short, so all of the examples in this article actually get bigger.
+
+| | | | | | | | | | | | | | | | | | | | | | | | | | | | | | |
+| --- | --- | --- | --- | --- | --- | --- | --- | --- | --- | --- | --- | --- | --- | --- | --- | --- | --- | --- | --- | --- | --- | --- | --- | --- | --- | --- | --- | --- | --- |
+| Byte | **0** | **1** | **2** | **3** | **4** | **5** | **6** | **7** | **8** | **9** | 10 | 11 | 12 | 13 | 14 | 15 | 16 | 17 | 18 | 19 | 20 | **21** | **22** | **23** | **24** | **25** | **26** | **27** | **28** |
+| Hex | **1f** | **8b** | **08** | **00** | **00** | **00** | **00** | **00** | **00** | **03** | cb | 48 | cd | c9 | c9 | 57 | c8 | 40 | 27 | b9 | 00 | **00** | **88** | **59** | **0b** | **18** | **00** | **00** | **00** |
+
+<figcaption>hello (1) – gzip contents</figcaption>
+
+The beginning and end in bold are the gzip header and footer. I learned the details of the format by reading [RFC 1952: gzip](https://www.rfc-editor.org/rfc/rfc1952.txt)
+
+- Byte 0+1 (1f8b): Two fixed bytes that indicate “this is a gzip file”. These file-type indicators are also called “magic bytes”.
+- Byte 2 (08): Indicates “the compression format is DEFLATE”. DEFLATE is the only format supported by gzip.
+- Byte 3 (00): Flags. 8 single-bit flags.
+ - Not set: TEXT (indicates this is ASCII text. hint to the decompressor only. i think gzip never sets this flag)
+ - Not set: HCRC (adds a 16-bit CRC to the header)
+ - Not set: EXTRA (adds an “extras” field to the header)
+ - Not set: NAME (adds a filename to the header–if you compress a file instead of stdin this will be set)
+ - Not set: COMMENT (adds a comment to the header)
+ - There are also three reserved bits which are not used.
+- Byte 4-7 (00000000): Mtime. These indicate when the compressed file was last modified, as a unix timestamp. gzip doesn’t set an associated time when compressing stdin. Technically the standard says it should use the current time, but this makes the output the same every time you run gzip, so it’s better than the original standard.
+- Byte 8 (00): Extra flags. 8 more single-bit flags, this time specific to the DEFLATE format. None are set so let’s skip it. All they can indicate is “minimum compression level” and “max compression level”.
+- Byte 9 (03): OS. OS “03” is Unix.
+- Byte 10-20: Compressed (DEFLATE) contents. We’ll take a detailed look at DEFLATE below.
+- Byte 21-24 (0088590b): CRC32 of the uncompressed data, “hello hello hello hello\\n”. I assume this is correct. It’s worth noting, there are multiple things called “CRC32”.
+- Byte 25-28 (18000000): Size of the uncompressed data. This is little-endian byte order, 0x00000018 = 16\*1+1\*8 = 24. The uncompressed text is 24 bytes, so this is correct.
+
+<figure class="wp-block-table" markdown="1">
+
+| | | | | | | | | | | | |
+| --- | --- | --- | --- | --- | --- | --- | --- | --- | --- | --- | --- |
+| Byte | 10 | 11 | 12 | 13 | 14 | 15 | 16 | 17 | 18 | 19 | 20 |
+| Hex | cb | 48 | cd | c9 | c9 | 57 | c8 | 40 | 27 | b9 | 00 |
+| Binary | 11001011 | 01001000 | 11001101 | 11001001 | 11001001 | 01010111 | 11001000 | 01000000 | 00100111 | 10111001 | 00000000 |
+| R. Bin. | 11010011 | 00010010 | 10110011 | 10010011 | 10010011 | 11101010 | 00010011 | 00000010 | 11100100 | 10011101 | 00000000 |
+
+<figcaption>hello (1) – DEFLATE contents</figcaption>
+
+## DEFLATE format: Basics and fixed huffman coding
+
+DEFLATE is the actual compression format used inside gzip. The format is detailed in [RFC 1951: DEFLATE](https://www.rfc-editor.org/rfc/rfc1951.txt). DEFLATE is a dense format which uses bits instead of bytes, so we need to take a look at the binary, not the hex, and things will not be byte-aligned. The endian-ness is a little confusing in gzip, so we’ll usually be looking at the “reversed binary” row.
+
+- As a hint, whenever we read bits, we use the “reverse” binary order. For Huffman codes, we keep the bit order in reverse. For fixed-length fields like integers, we reverse again into “normal” binary order. I’ll call out the order for each field.
+- Byte 10: **1** 1010011. Is it the last block? Yes.
+ - 1: Last block. The last block flag here means that after this block ends, the DEFLATE stream is over
+- Byte 10: 1 **10** 10011\. Fixed huffman coding. We reverse the bits (because it’s always 2 bits, and we reverse any fixed number of bits) to get 01.
+
+ - 00: Not compressed
+
+ - **01: Fixed huffman coding.**
+ - 10: Dynamic huffman coding.
+ - 11: Not allowed (error)
+- So we’re using “fixed” huffman coding. That means there’s a static, fixed encoding scheme being used, defined by the DEFLATE standard. The scheme is given by the tables below. Note that Length/Distance codes are special–after you read one, you may read some extra bits according to the length/distance lookup tables.
+
+| Binary | Bits | Extra bits | Type | Code |
+| --- | --- | --- | --- | --- |
+| 00110000-10111111 | 8 | 0 | Literal byte | 0-143 |
+| 110010000-111111111 | 9 | 0 | Literal byte | 144-255 |
+| 0000000 | 7 | 0 | End of block | 256 |
+| 0000001-0010111 | 7 | varies | Length | 257-279 |
+| 11000000-11000111 | 8 | varies | Length | 280-285 |
+
+<figcaption>Literal/End of Block/Length Huffman codes</figcaption>
+
+| Binary Code | Bits | Extra bits | Type | Value |
+| --- | --- | --- | --- | --- |
+| 00000-111111 | 5 | varies | Distance | 0-31 |
+
+<figcaption>Distance Huffman codes</figcaption>
+
+| Code | Binary | Meaning | Extra bits |
+| --- | --- | --- | --- |
+| 267 | 0001011 | Length 15-16 | 1 |
+
+<figcaption>Length lookup (abridged)</figcaption>
+
+| Code | Binary | Meaning | Extra bits |
+| --- | --- | --- | --- |
+| 4 | 00100 | Distance 5-6 | 1 |
+
+<figcaption>Distance lookup (abridged)</figcaption>
+
+- Now we read a series of codes. Each code might be
+ - a literal (one binary byte), which is directly copied to the output
+ - “end of block”. either another block is read, or if this was the last block, DEFLATE stops.
+ - a length-distance pair. first code is a length, then a distance is read. then some of the output is copied–this reduces the size of repetitive content. the compressor/decompressor can look up to 32KB backwards for duplicate content. This copying scheme is called [LZ77](https://en.wikipedia.org/wiki/LZ77_and_LZ78).
+- Huffman codes are a “prefix-free code” (confusingly also called a “prefix code”). What that means is that, even though the code words are different lengths from one another, you can always unambigously tell which binary *codeword* is next. For example, suppose the bits you’re reading starts with: 0101. Is the next binary codeword 0, 01, 010, or 0101? In a prefix-free code, only one of those is a valid codeword, so it’s easy to tell. You don’t need any special separator to tell you the codeword is over. The space savings from not having a separator is really important for good compression. The “huffman” codes used by DEFLATE are prefix-free codes, but they’re not really optimal Huffman codes–it’s a common misnomer.
+- Byte 10-11: 110 **10011000** 10010: A literal. 10011000 (152) minus 00110000 (48) is 104. 104 in ASCII is ‘h’.
+- Byte 11-12: 000 **10010101** 10011: A literal. 10010101 (149) minus 00110000 (48) is 101. 101 in ASCII is ‘e’.
+- Byte 12-13: 101 **10011100** 10011: A literal. 10011100 (156) minus 00110000 (48) is 108. 108 in ASCII is ‘l’.
+- Byte 13-14: 100 **10011100** 10011: Another literal ‘l’
+- Byte 14-15: 100 **10011111** 01010: A literal. 10011111 (159) minus 00110000 (48) is 111. 111 in ASCII is ‘o’.
+- Byte 15-16: 111 **01010000** 10011: A literal. 01010000 (80) minus 00110000 (48) is 32. 32 in ASCII is ‘ ‘ (space).
+- Byte 16-17: 000 **10011000** 00010: Another literal ‘h’.
+- Byte 17: 000 **0001011**: A length. 0001011 (11) minus 0000001 (1) is 10, plus 257 is 267. We look up distance 256 in the “length lookup” table. The length is 15-16, a range.
+- Byte 18: **1** 00100: Because the length is a range, we read extra bits. The “length lookup” table says to read 1 extra bit: 1. The extra bits need to be re-flipped back to normal binary order to decode them, but 0b1 flipped is still 0b1. 15 (bottom of range) plus 0b1 = 1 (extra bits) is 16, so the final length is 16.
+- Byte 18-19: 111 **00100** 10011101: After a length, we always read a distance next. Distances are encoded using a second huffman table. 00100 is code 4, which using the “distance lookup” table is distance 5-6.
+- Byte 18-19: 11100100 **1** 0011101. Using the “distance lookup” table, we need to read 1 extra bit: 0b1. Again, we reverse it, and add 5 (bottom end of range) to 0b1 (extra bits read), to get a distance of 6.
+- We copy from 6 characters ago in the output stream. The stream so far is “hello h”, so 6 characters back is starting at “e”. We copy 16 characters, resulting in “hello h**ello hello hello**“. Why this copy didn’t start with the second “h” instead of the second “e”, I’m not sure.
+- Byte 19-20: 1 **00111010** 0000000: A literal. 00111010 (58) minus 00110000 (48) is 10. 10 in ASCII is “\\n” (new line)
+- Byte 20: 0 **0000000**: End of block. In this case we ended nicely on the block boundry, too. This is the final block, so we’re done decoding entirely.
+- At this point we’d check the CRC32 and length match what’s in the gzip footer right after the block.
+
+Our final output is “hello hello hello hello\\n”, which is exactly what we expected.
+
+## Gzip format: Compressing a file
+
+Let’s generate a second example using a file.
+
+```
+echo -en "\xff\xfe\xfd\xfc\xfb\xfa\xf9\xf8\xf7\xf6\xf5\xf4\xf3\xf2\xf1" >test.bin
+gzip test.bin
+```
+
+This input file is pretty weird. In fact, it’s so weird that gzip compression will fail to reduce its size at all. We’ll take a look at what happens when compression fails in the next DEFLATE section below. But first, let’s see how gzip changes with a file instead of a stdin stream.
+
+| | | | | | | | | | | | | | | | | | | | | | | | | | | | | |
+| --- | --- | --- | --- | --- | --- | --- | --- | --- | --- | --- | --- | --- | --- | --- | --- | --- | --- | --- | --- | --- | --- | --- | --- | --- | --- | --- | --- | --- |
+| Byte | 0 | 1 | 2 | 3 | 4 | 5 | 6 | 7 | 8 | 9 | 10 | 11 | 12 | 13 | 14 | 15 | 16 | 17 | 18 | 19-38 | 39 | 40 | 41 | 42 | 43 | 44 | 45 | 46 |
+| Hex | 1f | 8b | 08 | 08 | 9f | 08 | ea | 60 | 00 | 03 | 74 | 65 | 73 | 74 | 2e | 62 | 69 | 6e | 00 | see below | c6 | d3 | 15 | 7e | 0f | 00 | 00 | 00 |
+
+<figcaption>binary garbage (2) – abridged gzip contents</figcaption>
+
+Okay, let’s take a look at how the header and footer changed.
+
+- Byte 0+1 (1f8b): Two fixed bytes that indicate “this is a gzip file”. These file-type indicators are also called “magic bytes”.
+- Byte 2 (08): Indicates “the compression format is DEFLATE”. DEFLATE is the only format supported by gzip.
+- Byte 3 (08): Flags. 8 single-bit flags.
+ - Not set: TEXT (indicates this is ASCII text. hint to the decompressor only. i think gzip never sets this flag)
+ - Not set: HCRC (adds a 16-bit CRC to the header)
+ - Not set: EXTRA (adds an “extras” field to the header)
+ - **Set: NAME** (adds a filename to the header)
+ - Not set: COMMENT (adds a comment to the header)
+ - There are also three reserved bits which are not used.
+- **Byte 4-7 (9f08ea60) . Mtime.** This is in little-endian order: 0x60ea089f is 1625950367. This is a unix timestamp — 1625950367 seconds after midnight, Jan 1, 1970 is 2021-07-10 20:52:47 UTC, which is indeed earlier today. This is the time the original file was last changed, not when compression happened. This is here so we can restore the original modification time if we want.
+- Byte 8 (00): Extra flags. None are set.
+- Byte 9 (03): OS. OS “03” is Unix.
+- **Byte 10-18 (74 65 73 74 2e 62 69 6e 00): Zero-terminated string.** The string is “test.bin”, the name of the file to decompress. We know this field is present because of the flag set.
+- Byte 19-38: The compressed DEFLATE stream.
+- **Byte 39-42 (c6d3157e): CRC32 of the uncompressed data.** Again, I’ll just assume this is correct.
+- **Byte 25-28 (0f000000): Size of the uncompressed data.** 0x0000000f = 15 bytes, which is correct.
+
+## DEFLATE format: Uncompressed data
+
+Uncompressed data is fairly rare in the wild from what I’ve seen, but for the sake of completeness we’ll cover it.
+
+| | | | | | | |
+| --- | --- | --- | --- | --- | --- | --- |
+| Byte | 19 | 20 | 21 | 22 | 23 | 24-38 |
+| Hex | 01 | 0f | 00 | f0 | ff | ff fe fd fc fa f9 f8 f7 f6 f5 f4 f3 f2 f1 |
+| Binary | 00000001 | 00001111 | 00000000 | 11110000 | 11111111 | omitted |
+| R. Binary | 10000000 | 11110000 | 00000000 | 00001111 | 11111111 | omitted |
+
+<figcaption>binary garbage (2) – DEFLATE contents</figcaption>
+
+- Again, we start reading “r. binary” — the binary bits in reversed order.
+- Byte 19: **1**0000000\. The first three bits are the most important bits in the stream:
+ - 1: Last block. The last block flag here means that after this block ends, the DEFLATE stream is over
+- Byte 19: 1**00** **00000**. Not compressed. For a non-compressed block only, we also skip until the end of the byte.
+
+ - **00: Not compressed**
+
+ - 01: Fixed huffman coding.
+ - 10: Dynamic huffman coding.
+- Byte 20-21: **11110000 00000000**. Copy 15 uncompressed bytes. We reverse the binary bits as usual for fixed fields. 0b0000000000001111 = 0x000f = 15.
+- Byte 22-23: **00001111 11111111.** This is just the NOT (compliment) of byte 20-21 as a check. It can be ignored.
+- Byte 24-38: **ff fe fd fc fb fa f9 f8 f7 f6 f5 f4 f3 f2 f1**: 15 literal bytes of data, which are directly copied to the decompressed output with no processing. Since we only have one block, this is the whole of the decompressed data.
+
+## DEFLATE format: Dynamic huffman coding
+
+Dynamic huffman coding is by far the most complicated part of the DEFLATE and gzip specs. It also shows up a lot in practice, so we need to learn this too. Let’s take a look with a third and final example.
+
+```
+echo -n "abaabbbabaababbaababaaaabaaabbbbbaa" | gzip
+```
+
+The bytes we get are:
+
+- Byte 0-9 (**1f 8b 08 00 00 00 00 00 00 03**): Header
+- Byte 10-32 (1d c6 49 01 00 00 10 40 c0 ac a3 7f 88 3d 3c 20 2a 97 9d 37 5e 1d 0c): DEFLATE contents
+- Byte 33-40 (**6e 29 34 94 23 00 00 00**): Footer. The uncompressed data is 35 bytes.
+
+We’ve already seen everything interesting in the gzip format, so we’ll skip the header and footer, and move straight to looking at DEFLATE this time.
+
+| | | | | | | | | | | | | | | | | | | | | | | | |
+| --- | --- | --- | --- | --- | --- | --- | --- | --- | --- | --- | --- | --- | --- | --- | --- | --- | --- | --- | --- | --- | --- | --- | --- |
+| Byte | 10 | 11 | 12 | 13 | 14 | 15 | 16 | 17 | 18 | 19 | 20 | 21 | 22 | 23 | 24 | 25 | 26 | 27 | 28 | 29 | 30 | 31 | 32 |
+| Hex | 1d | c6 | 49 | 01 | 00 | 00 | 10 | 40 | c0 | ac | a3 | 7f | 88 | 3d | 3c | 20 | 2a | 97 | 9d | 37 | 5e | 1d | 0c |
+| Binary | 00011101 | 11000110 | 01001001 | 00000001 | 00000000 | 00000000 | 00010000 | 01000000 | 11000000 | 10101100 | 10100011 | 01111111 | 10001000 | 00111101 | 00111100 | 00100000 | 00101010 | 10010111 | 10011101 | 00110111 | 01011110 | 00011101 | 00001100 |
+| R. Binary | 10111000 | 01100011 | 10010010 | 10000000 | 00000000 | 00000000 | 10000000 | 00000010 | 00000011 | 00110101 | 11000101 | 11111110 | 00010001 | 10111100 | 00111100 | 00000100 | 01010100 | 11101001 | 10111001 | 11101100 | 01111010 | 10111000 | 00110000 |
+
+<figcaption>abaa stream – DEFLATE contents</figcaption>
+
+- As usual, we read “r. binary” — the binary bits in reversed order.
+- Byte 10: **1**0111000\. Last (only) block. The DEFLATE stream is over after this block.
+- Byte 10: 1**01**11000\. 10=Dynamic huffman coding
+
+ - 00: Not compressed
+
+ - 01: Fixed huffman coding.
+ - **10: Dynamic huffman coding.**
+
+## Which parts are dynamic?
+
+Okay, so what does “dynamic” huffman coding mean? A fixed huffman code had several hardcoded values defined by the spec. Some are still hardcoded, but some will now be defined by the gzip file.
+
+1. The available literals are all single-byte literals. **The literals remain fixed by the spec.**
+2. There is a “special” literal indicating the end of the block in both.
+3. The lengths (how far to look backwards when copying) were given as ranges whose size was a power of two. For example, there would be one binary code (0001011) for the length range 15-16. Then, we would read one extra bit (because the range is 2^1 elements long) to find the specific length within that range. **In a dynamic coding, the length ranges remain fixed by the spec.** (“length lookup” table)
+4. Again, the actual ranges and literals are fixed by the spec. **The binary codewords to represent (lengths/literals/end-of-block) are defined in the gzip stream instead of hardcoded.** (“literal/end-of-block/length huffman codes” table)
+5. Like the literal ranges, **the distance ranges remain fixed by the spec.** (“distance lookup” table)
+6. Although the distance ranges themselves are fixed, **the binary codewords to represent distance ranges are defined in the gzip stream instead of hardcoded.** (“distance huffman codes” table)
+
+So basically, the possible lengths and distances are still the same (fixed) ranges, and the literals are still the same fixed literals. But where we had two hardcoded tables before, now we will load these two tables from the file. Since storing a table is bulky, the DEFLATE authors heavily compressed the representation of the tables, which is why dynamic huffman coding is so complicated.
+
+## Aside: Storing Prefix-Free Codewords as a List of Lengths
+
+Suppose we have a set of prefix-free codewords: 0, 10, 1100, 1101, 1110, 1111. Forget about what each codeword means for a second, we’re just going to look at the codewords themselves.
+
+We can store the lengths as a list: 1, 2, 4, 4, 4, 4.
+
+- You could make another set of codewords with the same list of lengths. But for our purposes, as long as each value gets the same length of codeword, we don’t really care which of those codes we pick–the compressed content will be the same length.
+- Since we don’t really care how if the bits change, any code is fine. For simplicity, we pick a unique “standard” code. When we list the codewords, the standard one can be listed BOTH in order of length, AND in normal sorted order. That is, the those two orders are the same. The example code above is a standard code. Here’s one that isn’t: 1, 01, 00.
+- It turns out that if we have the lengths, we can generate a set of prefix-free codewords with those lengths. There’s an easy algorithm to generate the “standard” code from the list of lengths (see RFC 1951, it’s not very interesting)
+- Since we picked the standard codewords, we can switch back and forth between codewords and codeword lengths without losing any information.
+- It’s more compact to store the codeword lengths than the actual codewords. DEFLATE just stores codeword lengths everywhere (and uses the corresponding generated code).
+
+Finally, we need to make them correspond to symbols, so we actually store
+
+- We store lengths for each symbol: A=4, B=1, C=4, D=4, E=2, F=4
+- We can get the correct codewords by going through the symbols in order, and grabbing the first available standard codeword: A=1100, B=0, C=1101, D=1110, E=10, F=1111.
+
+## Dynamic Huffman: Code Lengths
+
+What’s a “code length”? It’s yet another hardcoded lookup table, which explains how to compress the dynamic huffman code tree itself. We’ll get to it in a second–the important thing about it for now is that there are 19 rows in the table. The binary column (not yet filled in) is what we’re about to decode.
+
+| | | | |
+| --- | --- | --- | --- |
+| Binary | Code | What it means | Extra bits |
+| ? | 0-15 | Code length 0-15 | 0 |
+| ? | 16 | Copy the previous code length 3-6 times | 2 |
+| ? | 17 | Copy “0” code length 3-10 times | 3 |
+| ? | 18 | Copy “0” code length 11-138 times | 7 |
+
+<figcaption>Code Lengths (static)</figcaption>
+
+- Byte 10: 101 **11000**. Number of literal/end-of-block/length codes (257-286). Read bits in forward order, 0b00011=3, plus 257 is 260 length/end-of-block/literal codes.
+- Byte 11: **01100** 011. Number of distance codes (1-32). Read bits in forward order, 0b00110=6, plus 1 is 7 distance codes.
+- Byte 11-12: 01100 **0111** 0010010\. Number of *code length codes* used (4-19). Read bits in forward order, 0b1110=14, plus 4 is 18.
+- Byte 12-18 1 **001 001 010 000 000 000 000 000 000 000 000 001 000 000 000 100 000 001** 1: There are 18 codes used (out of 19 available). For each code length code, we read a 3-bit number (in big-endian order) called the “code length code length”, and fill the end with 0s: 4, 4, 2, 0, 0, 0, 0, 0, 0, 0, 0, 4, 0, 0, 0, 1, 0, 4\[, 0\]
+- Next, we re-order the codes in the order 16, 17, 18, 0, 8, 7, 9, 6, 10, 5, 11, 4, 12, 3, 13, 2, 14, 1, 15. This re-order is just part of the spec, don’t ask why–it’s to save a small amount of space.
+ The old order is: 16: 4, 17: 4, 18: 2, 0:0, 8:0, 7:0, 9:0, 6:0, 10:0, 5:0, 11:0, 4:4, 12:0, 3:0, 13:0, 2:1, 14:0, 1:4, 15:0
+ The new order is: 0:0, 1:4, 2:1, 3:0, 4:4, 5:0, 6:0, 7:0, 8:0, 9:0, 10:0, 11:0, 12:0, 13:0, 14:0, 15:0, 16: 4, 17: 4, 18: 2
+- 0s indicate the row is not used (no codeword needed). Let’s re-write it without those.
+ 1:4, 2:1, 4:4, 16: 4, 17: 4, 18: 2
+- Now we assign a binary codewords of length N, to each length N in the list.
+ 1:1100,2:0,4:1101,16:1110,17:1111,18:10
+- Finally, let’s take a look at the whole table again.
+
+| Binary | Code | What it means | Extra bits |
+| --- | --- | --- | --- |
+| 1100 | 1 | Code length 1 | 0 |
+| 0 | 2 | Code length 2 | 0 |
+| 1101 | 4 | Code length 4 | 0 |
+| 1110 | 16 | Copy the previous code length 3-6 times | 2 |
+| 1111 | 17 | Copy “0” code length 3-10 times | 3 |
+| 10 | 18 | Copy “0” code length 11-138 times | 7 |
+
+<figcaption>Code Lengths</figcaption>
+
+- Great, we’ve parsed the code lengths table.
+
+## Dynamic Huffman: Parsing the Huffman tree
+
+- As a reminder, in bytes 10-12 we found there was a 260-row literal/end-of-block/length table and a 7-row distance table. Let’s read 267 numbers: the lengths of the codeword for each row.
+- Byte 18-19: 0000001 **10 0110101**. Copy “0” code length 11-138 times
+ 0b1010110=86, plus 11 is 97. Literals 0-96 are not present.
+- Byte 20: **1100** 0101: Literal 1. Literal 97 (‘a’) has a codeword of length 1.
+- Byte 20: 1100 **0** 101: Literal 2. Number 98 (‘b’) has a codeword of length 2.
+- Byte 20-21: 11000 **10 1111111** 10. Copy “0” code length 11-138 times. 0b1111111=127, plus 11 is 138. Literals 99-236 are not present.
+- Byte 21-22: 111111 **10** **0001000** 1. Copy “0” code length 11-138 times. 0b0001000=8, plus 11 is 19. Literals 237-255 are not present.
+- Bytes 22-23: 0001000 **1101** 11100\. Literal 256 (end-of-block) has a codeword of length 4.
+- Byte 23-24: 101 **1110** **00** 0111100. Copy previous code 3-6 times. 0b00=0, plus 3 is 3. “Literals” 257-259 (all lengths) have codewords of length 4.
+- We read 260 numbers, that’s the whole literal/end-of-block/length table. Assign the “standard” binary codewords based on the lengths to generate the following table:
+
+| Literal Code | Code Length | Binary | Meaning | Extra bits |
+| --- | --- | --- | --- | --- |
+| 97 | 1 | 0 | Literal ‘a’ | 0 |
+| 98 | 2 | 10 | Literal ‘b’ | 0 |
+| 256 | 4 | 1100 | End-of-block | 0 |
+| 257 | 4 | 1101 | Length 3 | 0 |
+| 258 | 4 | 1110 | Length 4 | 0 |
+| 259 | 4 | 1111 | Length 5 | 0 |
+
+<figcaption>abaa dynamic literal/end-of-block/length Huffman codes</figcaption>
+
+- Now we read 7 more numbers in the same format: the 7-row distances table.
+- Byte 24: 0 **0** 111100\. Distance 0 has a codeword of length 2.
+- Byte 24-25: 00 **1111** **000** 0000100. Copy “0” code length 3-10 times. 0b000=0, plus 3 is 3. Distances 1-3 are not present.
+- Byte 25: 0 **0 0 0** 0100: Distances 4-6 have length 2.
+- We read 7 numbers, that’s the whole distances table. Assign the “standard” binary codewords to generate the following table:
+
+| Code | Bits | Binary | Meaning | Extra Bits |
+| --- | --- | --- | --- | --- |
+| 0 | 2 | 00 | Distance 1 | 0 |
+| 4 | 2 | 01 | Distance 5-6 | 1 |
+| 5 | 2 | 10 | Distance 7-8 | 1 |
+| 6 | 2 | 11 | Distance 9-12 | 2 |
+
+<figcaption>abaa dynamic literal/end-of-block/length Huffman codes</figcaption>
+
+## Dynamic Huffman: Data stream decoding
+
+- Now we’re ready to actually decode the data. Again, we’re reading a series of codes from the literal/end-of-block/length Huffman code table.
+- Byte 25: 0000**0 10 0**: Literal ‘a’, ‘b’, ‘a’
+- Byte 26: **0** **10** **10** **10** **0**: Literal ‘a’, ‘b’, ‘b’, ‘b’, ‘a’.
+- Byte 27: **1110 10** **0** 1. Length 4. Whenever we read a length, we read a distance. The distance is a range, 7-8. The extra bit we read is 0b0=0, plus 7 is Distance 7. So we look back 7 bytes and copy 4. The new output is: baabbba**baab**
+- Byte 27-28: 1110100 **1101** **11** **00** 1: Length 3, Distance 9. We look back 9 bytes and copy 3. The new output is: abbabaab**abb**
+- Byte 28-29: 1011100 **1111** **01** **1** 00. Length 5, Distance 6. We look back 6 bytes and copy 5. The new output is: aababb**aabab**
+- Byte 29: 111011 **0 0**. Literal ‘a’, ‘a’.
+- Byte 30: **0** 1111010. Literal ‘a’.
+- Byte 30: 0 **1111 01** **0**. Length 5, Distance 5. We look back 5 bytes and copy 5. The new output is: abaaa**abaaa**
+- Byte 31: **10** 111000: Literal ‘b’
+- Byte 31: 10 **1110** **00**: Length 4, Distance 1. We look back 1 byte and copy 4. The new output is: b**bbbb**
+- Byte 32: **0 0** 110000: Literal ‘a’, ‘a’.
+- Byte 32: 00 **1100** **00**: End-of block. Since this is the final block it’s also the end of the stream. This didn’t come up in the first example, but we zero-pad until the end of the byte when the block ends.
+- The final output is a b a a b b b a baab abb aabab a a a abaaa b bbbb a a (spaces added for clarity), which is exactly what we expected.
--- /dev/null
+---
+author: admin
+categories:
+- Non-Technical
+date: 2015-04-30 03:12:07-07:00
+markup: html
+source: wordpress
+tags:
+- carpentry
+- lost purposes
+title: Whiteboard Partition
+updated: 2015-04-30 03:12:07-07:00
+wordpress_id: 201
+wordpress_slug: whiteboard-partition
+---
+I wanted a partition to divide my room, and I had a whiteboard sitting around. I sawed it into three parts, and connected them with hinges:
+
+
+
+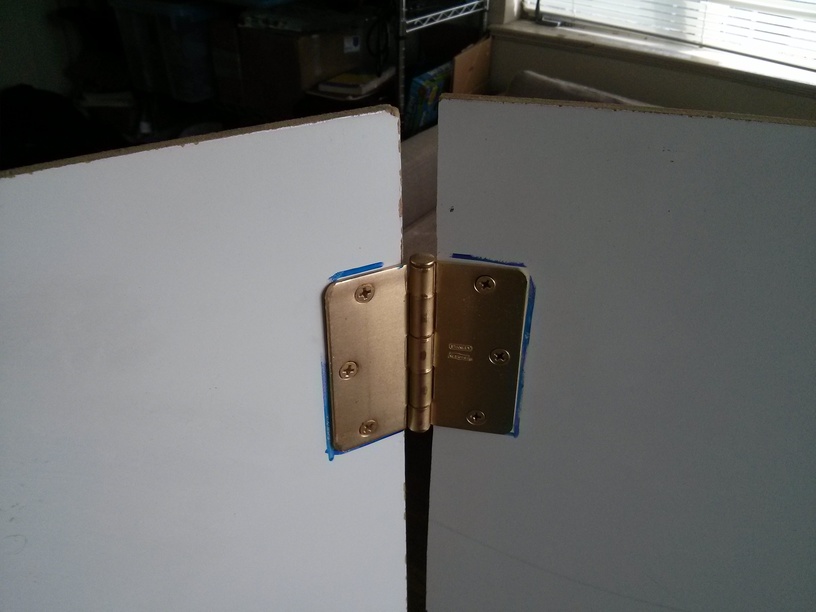
+
+
+
+I’m a little embarrassed at having done all this, since it was obvious as soon as I started the partition was way too short to work. I figured I’d still get some experience woodworking (this is my first project). Here’s where it went:
+
+
+
+and I never saw it again
--- /dev/null
+---
+author: admin
+categories:
+- Non-Technical
+date: 2015-10-10 18:17:34-07:00
+markup: html
+source: wordpress
+tags:
+- art
+- piskell
+- pixel art
+title: Whoosh!
+updated: 2015-10-17 19:15:58-07:00
+wordpress_id: 282
+wordpress_slug: whoosh
+---
+[](https://blog.za3k.com/wp-content/uploads/2015/10/action-potato.png)
+
+It’s whooshing because it’s going as fast as a WEAK SPEEDBOAT.
--- /dev/null
+---
+author: admin
+categories:
+- Non-Technical
+date: 2015-04-16 18:47:16-07:00
+markup: html
+source: wordpress
+tags:
+- bootstrap
+- dead tree
+- publishing
+- website
+title: 'WIP: Dead Tree Publishing 3'
+updated: 2015-04-16 18:58:51-07:00
+wordpress_id: 167
+wordpress_slug: wip-dead-tree-publishing-3
+---
+Compared with [last update](https://blog.za3k.com/wip-dead-tree-publishing-2/ "WIP: Dead Tree Publishing 2"), the Dead Tree Publishing website is looking nicer.
+
+[](https://blog.za3k.com/wp-content/uploads/2015/04/2015-04-16-184416_1366x768.jpg)
+
+It’s served over HTTPS now (not needed for security, but it puts people at ease and enabled Chrome’s autocomplete) and you can order multiple books at a time.
+
+Other than some more visual improvements, the main thing missing is proper detection of page size — my server doesn’t understand about page margins, so it things books are bigger than they really are.
--- /dev/null
+---
+author: admin
+categories:
+- Non-Technical
+date: 2015-04-30 18:08:01-07:00
+markup: html
+source: wordpress
+tags:
+- bootstrap
+- dead tree
+- publishing
+title: 'WIP: Dead Tree Publishing 4'
+updated: 2015-04-30 18:25:40-07:00
+wordpress_id: 214
+wordpress_slug: wip-dead-tree-publishing-4
+---
+I consider Dead Tree Publishing to be **G**ood **E**nough at this point. It’s launched.
+
+[](https://blog.za3k.com/wp-content/uploads/2015/04/2015-04-30-180400_1366x768.jpg)
+
+I’m going to add support for URLs instead of uploading PDFs, and fix some bugs here for there, but it’s essentially done.
+
+Meanwhile, I’ve already received my first physical book I’m publishing through the site. I got this nice email from Eric Eve:
+
+```
+Dear Zachary,
+
+Thank you for your interest in my work. Yes, do please feel free to offer print copies of the TADS 3 Tour Guide (or any other of my TADS 3 documentation) along the lines you suggest. The only copyright right I’m interested in enforcing is my right to be identified as the author of the work, and I'm sure that's not as issue here.
+
+Best wishes,
+
+Eric
+```
--- /dev/null
+---
+author: admin
+categories:
+- Non-Technical
+date: 2015-03-29 14:12:31-07:00
+markup: html
+source: wordpress
+tags:
+- dead tree
+- digital
+- PDF
+- physical
+- publishing
+- website
+title: 'WIP: Dead Tree Publishing'
+updated: 2015-04-28 23:09:22-07:00
+wordpress_id: 147
+wordpress_slug: wip-dead-tree-publishing
+---
+I started work on my publishing website again (Dead Tree Publishing). The idea is to make a really, really convenient way to get a physical copy of a PDF/epub book. Think: “send me a printed copy of this mailing list / tumblr”. Right now things are looking encouraging.
+
+I use a “back end” publisher who does all the actual printing, and the one I was using before charged quite a lot and wasn’t amazingly fast; I just used them because they were the only publisher who was at all up to date. Seriously, order of $100 – $200 for a 100 page book, just absolutely ridiculous levels of expensive. I’m switching over to a new publisher who can offer that same book for something like $7 (maybe $12 in hardback), which is absolutely reasonable, and with similar 2-week turnaround times.
+
+First you upload a PDF:
+
+[](https://blog.za3k.com/wp-content/uploads/2015/03/1.jpg)
+
+Then I tell you what your ordering options are (hardcover, softcover, color), and what they cost. I’m also supposed to ask you your address to ship the book, and for you to pay for it, but those aren’t done yet.
+
+[](https://blog.za3k.com/wp-content/uploads/2015/03/1.jpg)
+
+Hopefully in the next day or two I’ll have something up and running so people can order books, and then make it gradually nicer! I’m very excited about this website existing.
--- /dev/null
+---
+author: admin
+categories:
+- Technical
+date: 2015-04-13 17:46:31-07:00
+markup: html
+source: wordpress
+tags:
+- boot
+- installer
+- iso
+- os
+- system administration
+- windows
+- windows xp
+title: XP Boot USB Stick
+updated: 2015-04-13 17:51:06-07:00
+wordpress_id: 158
+wordpress_slug: xp-boot-usb-stick
+---
+Most of the following taken from : [http://www.msfn.org/board/topic/151992-install-xp-from-usb-without-extra-tools/](http://www.msfn.org/board/topic/151992-install-xp-from-usb-without-extra-tools/), just modified to include syslinux support.
+
+Let me know if there are any omissions; it an XP installer bluescreens on boot for me so I can’t actually test.
+
+1. Obtain an XP iso file
+2. Format drive with one FAT parition, marked bootable.
+3.
+ ```
+ syslinux -i /dev/sdXX
+ ```
+
+4.
+ ```
+ $ cp /usr/lib/syslinux/bios/mbr.bin >/dev/sdX
+ ```
+
+5.
+ ```
+ $ mount /dev/sdXX /mnt
+ ```
+
+6.
+ ```
+ mkdir /tmp/xp_iso
+ mount xp.iso /tmp/xp_iso
+ cp -ar /tmp/xp_iso/* /mnt
+ umount /tmp/xp_iso
+ rmdir xp_iso
+ ```
+
+7.
+ ```
+ cp /usr/lib/syslinux/bios/{chain.c32,libutil.c32,menu.c32,libcom.c32} /mnt
+ ```
+
+8.
+ ```
+ cp /mnt/I386/{NTDETECT.COM,SETUPLDR.BIN,TXTSETUP.SIF} /mnt
+ ```
+
+9. Edit /mnt/syslinux.cfg:
+
+ ```
+ UI menu.c32# Windows XP
+ LABEL windows_xp
+ MENU LABEL Run Windows ^XP Setup
+ COM32 chain.c32
+ APPEND fs ntldr=SETUPLDR.BIN
+ ```
+
+10.
+ ```
+ umount /mnt
+ ```
+
+11. Boot from the USB stick
--- /dev/null
+---
+author: admin
+categories:
+- Technical
+date: 2024-05-26 18:25:37-07:00
+markup: html
+source: wordpress
+tags:
+- hardware
+- zorchpad
+title: Zorchpad keyboard update
+updated: 2024-05-26 18:28:14-07:00
+wordpress_id: 1372
+wordpress_slug: zorchpad-keyboard-update
+---
+The Zorchpad needs a custom keyboard. Its power budget is only 1mW, and there’s just nothing available in that range. So, I need to make a custom keyboard. I started reading up on how to make your own–especially the electronics.
+
+I don’t know how to make a PCB:
+
+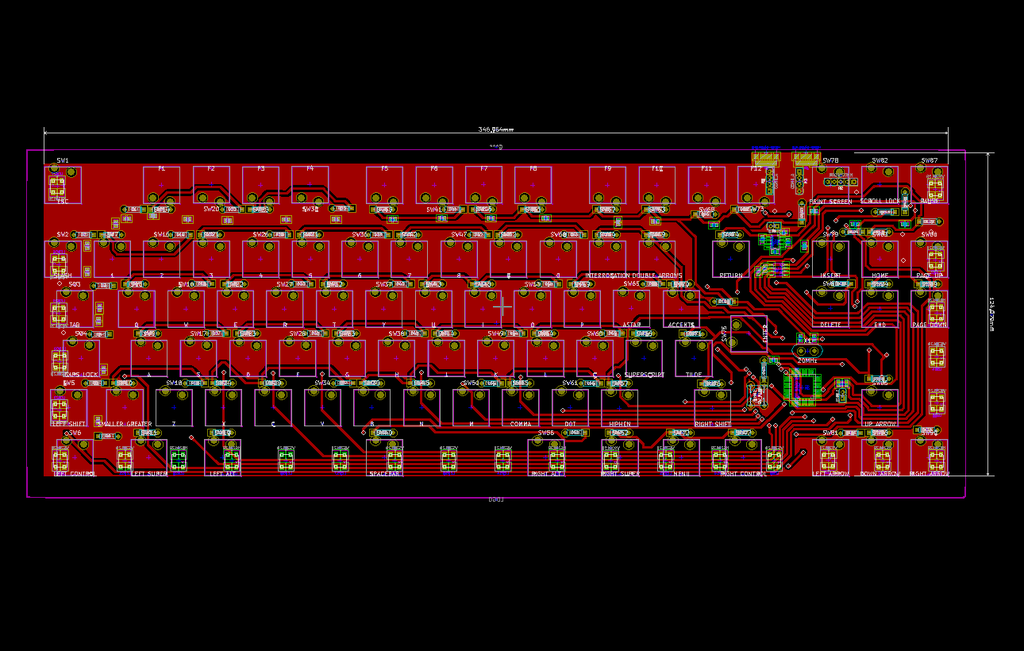
+
+Or how to attach headers to the inside of an existing keyboard, which looks like this–:
+
+
+
+But I found a project called [GOLEM](https://golem.hu/guide/keyboard-build-logs/) with an excellent guide to making your own keyboard. Here is their wiring:
+
+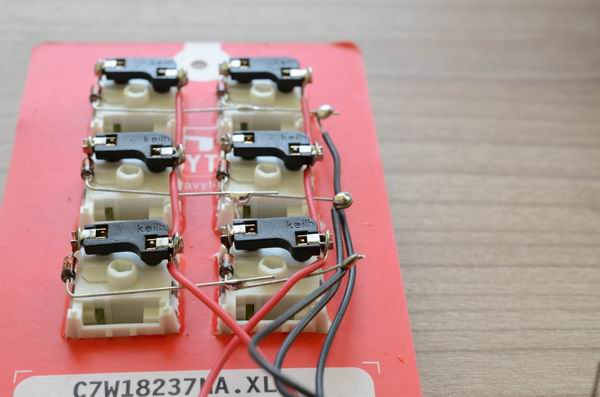
+
+I can do that! They got me out of a major rut.
+
+---
+
+[Their advice](https://golem.hu/guide/first-macropad) walks you through how to do a small keyboard in a cardboard plate. I did a few keys, gauged the effort, and decided to use my 3D printer. Cutting out 50-60 keys precisely by hand doesn’t sound easy. Worse, if you mess up, you have to start over. In plastic, I can’t mess up halfway, and the spacers to support the keyboard can be part of the print.
+
+[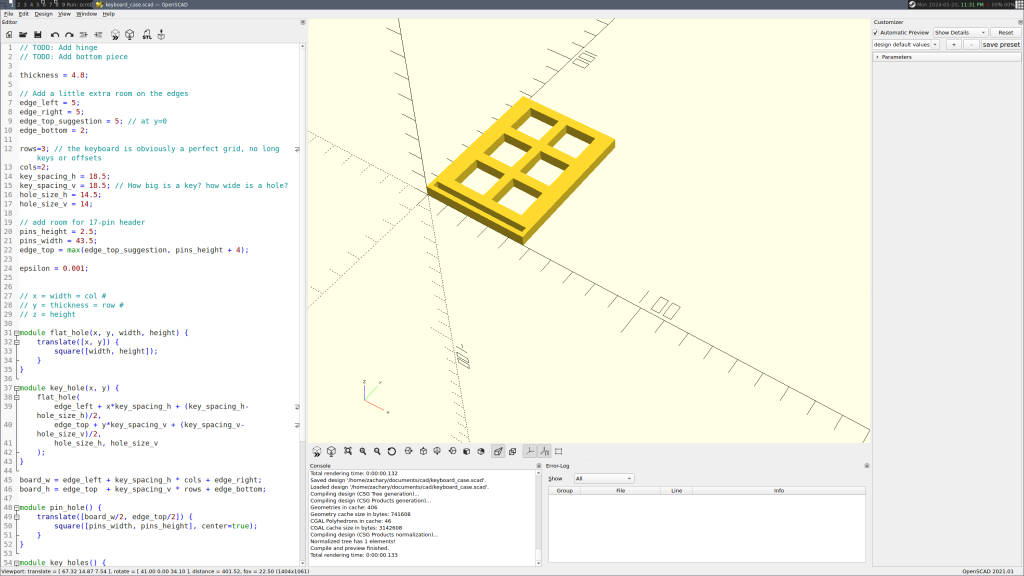](https://blog.za3k.com/wp-content/uploads/2024/05/2024-05-20-233106_2560x1440_scrot.png)
+
+Above, I’m designing a “sampler” keyboard in CAD (OpenSCAD). I want to iron out problems in my process before I try a full-size keyboard. Below, Prusa-Slic3r is slicing the finished model for my 3D printer to print.
+
+[](https://blog.za3k.com/wp-content/uploads/2024/05/2024-05-20-235849_1920x1080_scrot.png)
+
+Here’s the finished sampler keyboard:
+
+[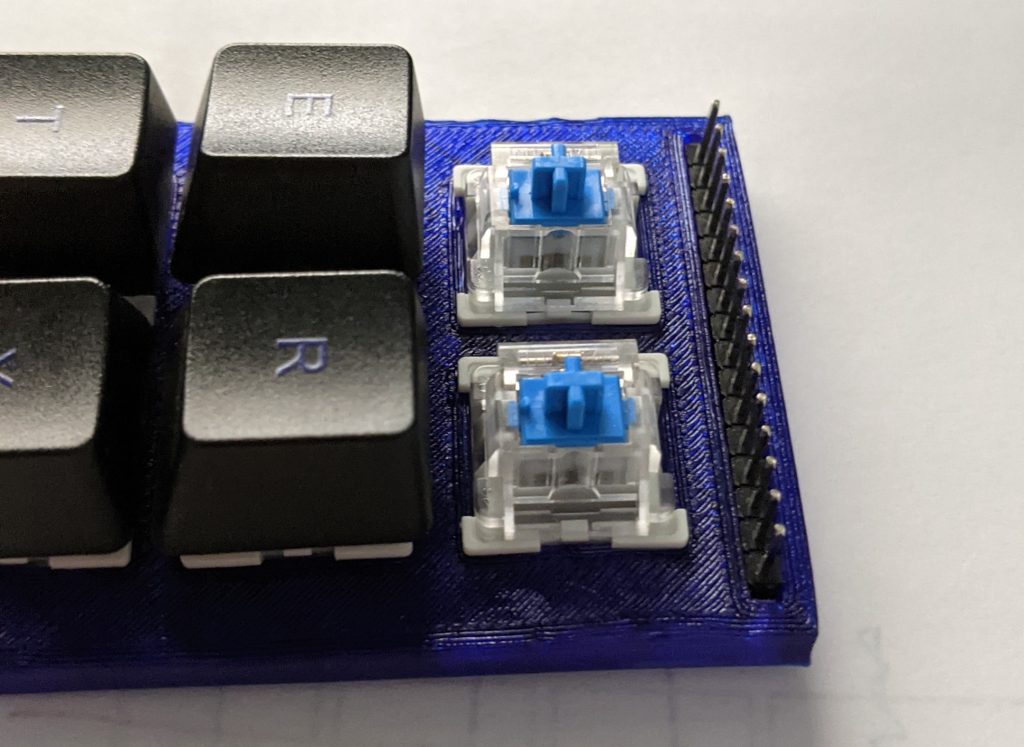](https://blog.za3k.com/wp-content/uploads/2024/05/tiny_keyboard2-1.jpg)
+
+Currently I’m waiting on keycaps and switches ordered from China, and then I’ll put together my finished keyboard. But I have been making some progress in the meantime. Here’s the layout I’m going to try.
+
+[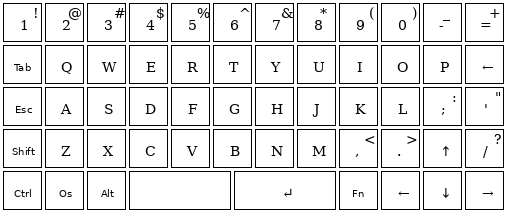](https://blog.za3k.com/wp-content/uploads/2024/05/keyboard57.png)
+
+And I’ve started streaming some development of a case and keyboard on [Twitch](https://www.twitch.tv/za3k) (Tue/Thu 12pm noon, EDT). Feel free to join! Anyone can watch, but you need an account to chat.
+
+[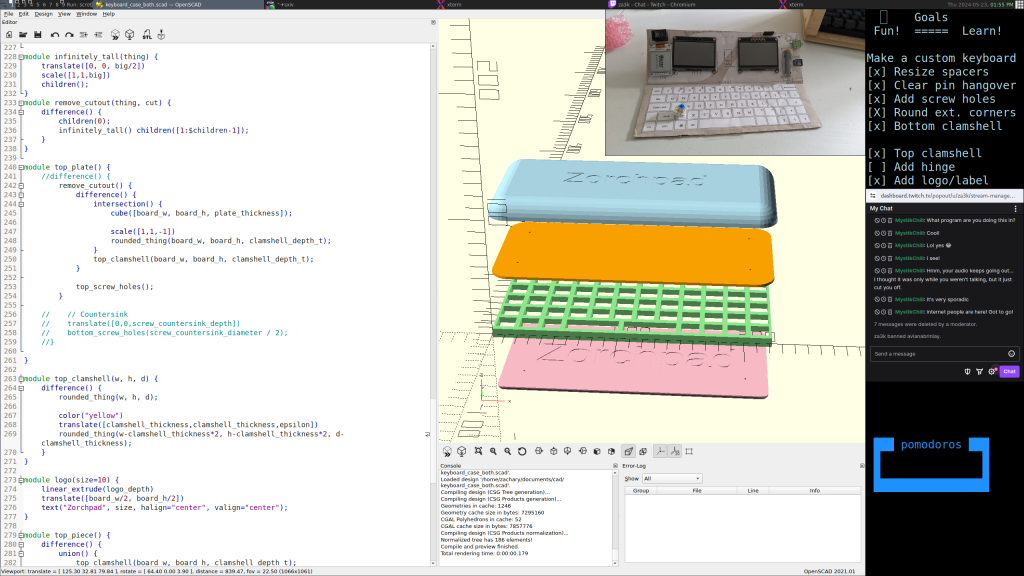](https://blog.za3k.com/wp-content/uploads/2024/05/stream.png)